Refreshing Watermelon Cake Recipe- Summer Delight
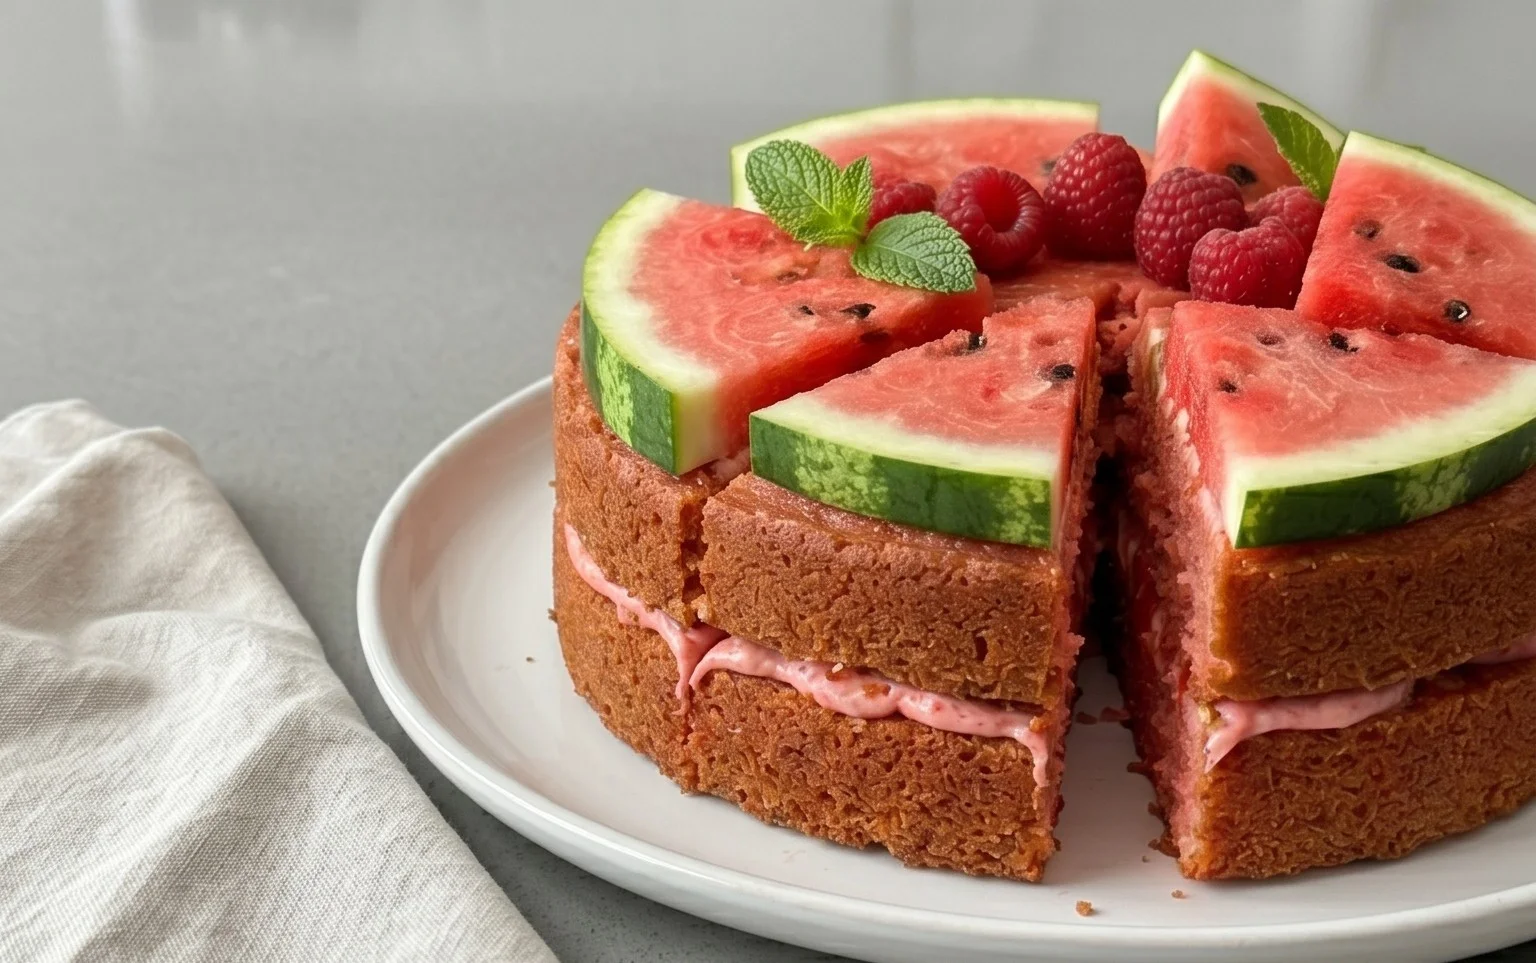
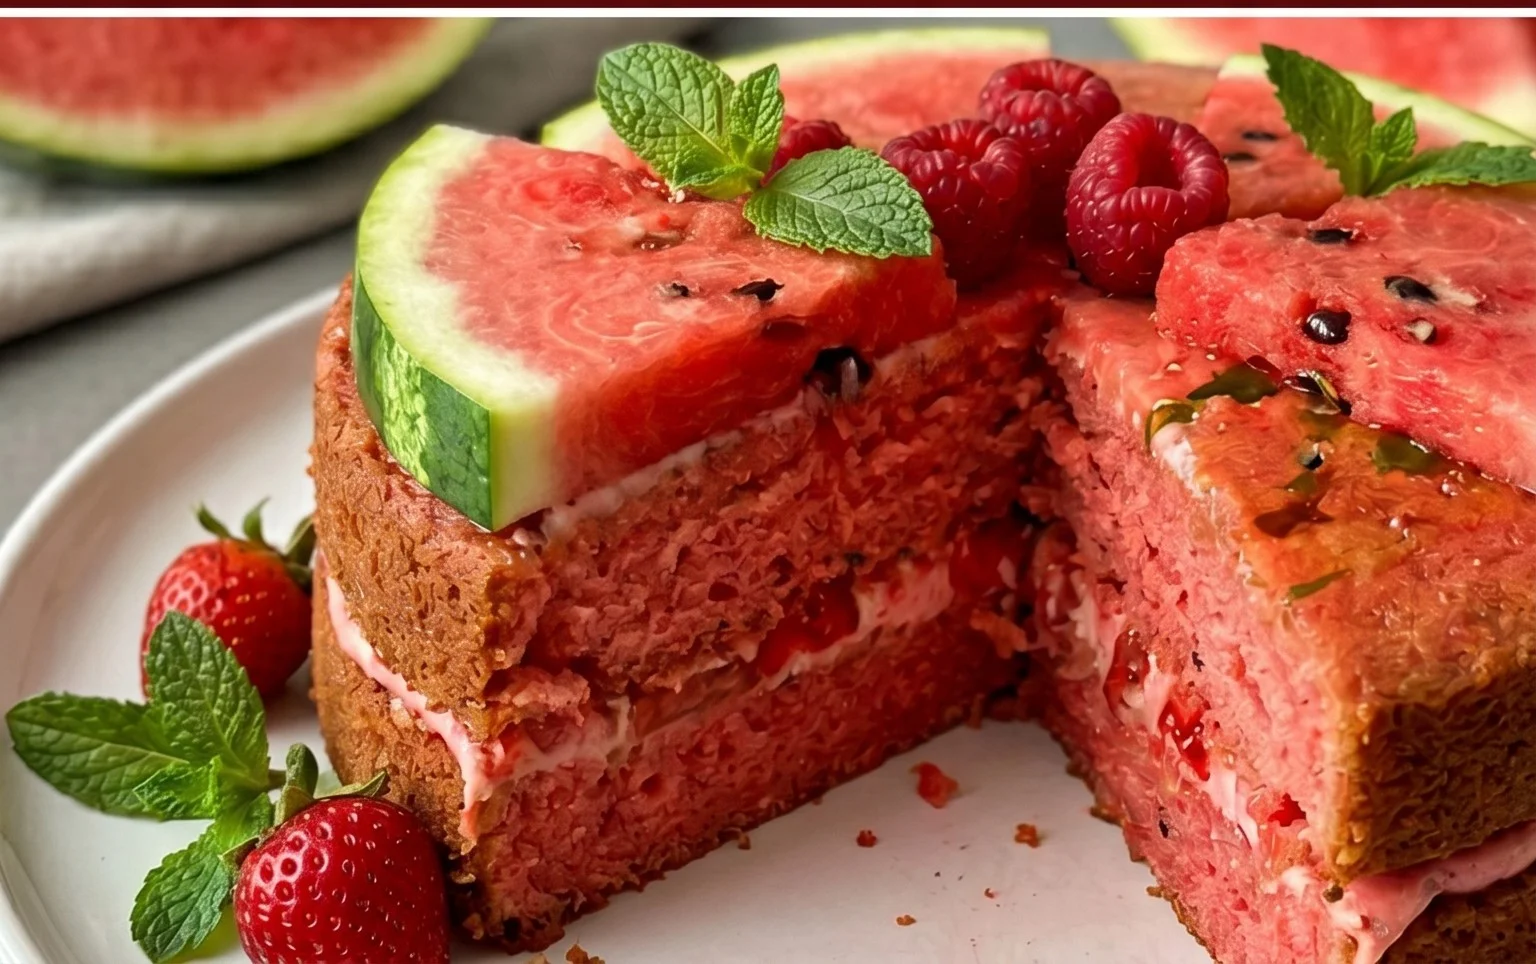
Watermelon Cake isn’t just a dessert; it’s a vibrant celebration of summer’s sweetest bounty, and I am absolutely obsessed with it. Imagin extracte the sheer delight of biting into a slice that tastes like pure sunshine and effortless freshness. This isn’t your average baked confection; it’s a light, refreshing, and incredibly beautiful dessert that tricks the eye and tantalizes the taste buds. What makes this Watermelon Cake so special? It’s the ingenious way we transform a humble watermelon into a stunning, layered masterpiece, often adorned with a cloud-like whipped cream frosting and fresh berries, mimicking the look of a traditional cake without the heaviness. It’s the perfect centerpiece for picnics, birthdays, or any occasion where you want to bring a burst of color and pure, unadulterated joy to the table. Get ready to wow your friends and family with this show-stopping treat!
Refreshing Watermelon Cake: A No-Bake Summer Delight
Summer calls for light, refreshing treats, and this Watermelon Cake is the absolute star of the show! Forget heavy baking; this beautiful creation is all about the vibrant, natural sweetness of watermelon, adorned with a medley of fresh berries and a hint of mint. It’s incredibly simple to assemble, making it perfect for picnics, barbecues, or just a fun family activity. The visual appeal is undeniable, with its layered pink “cake” and colorful berry “frosting.” Let’s dive into creating this showstopper!
Ingredients:
Preparing the Watermelon “Cake” Layers
This is where the magic begin extracts. We’re going to transform our watermelons into cake layers without any baking involved.
Step 1: Carving the Watermelon Rounds
First, we need to select our watermelons. You’ll want the large watermelon for your main cake base, and the smaller one can be used for additional decorative elements or a slightly smaller tier if you’re feeling ambitious. For our main “cake,” we’ll focus on the large one. Wash the exterior of the watermelon thoroughly. Place it on a sturdy cutting board. Using a large, sharp knife, carefully trim off the ends of the watermelon. You want to create flat surfaces so it can stand upright. Then, stand the watermelon on one of its flat ends and carefully slice off the rind, following the curve of the fruit. Aim to create a cylindrical “cake” shape, as round and even as possible. You’ll want to remove all the green rind and the white pith, exposing the bright red flesh. Repeat this process until you have a nice, solid cylinder of watermelon. Don’t worry if it’s not perfectly shaped; the berries will cover a lot of imperfections.
Step 2: Creating the Cake Layers
Once you have your watermelon cylinder, it’s time to create the “layers.” For a classic layered cake look, you’ll want to slice this cylinder horizontally. Insert your knife into the side of the watermelon and slice all the way around, creating a thick, round “cake” layer. You can aim for a thickness of about 2-3 inches, depending on how tall you want your cake. If you want multiple tiers, you can then take a slightly smaller watermelon (or even trim down your first one) and repeat the process to create a second, smaller layer. For this recipe, we’ll assume one main, thick layer, but feel free to experiment!
Assembling the Berry “Frosting” and Decorations
Now comes the fun part – decorating! This is where we add all the delicious, colorful fruit that makes this cake a true masterpiece.
Step 3: Securing and Preparing for Decoration
Carefully transfer your watermelon “cake” layer to your serving platter. It’s often helpful to have a sturdy platter that can handle the weight. If you’re concerned about it shifting, you can insert a couple of short wood skewers vertically into the base of the watermelon to help anchor it to the platter. Now, pat the top and sides of the watermelon gently with paper towels to remove any excess moisture. This will help the berries adhere better.
Step 4: Applying the Berry “Frosting”
This is where we get creative with our berries! You can think of this as frosting a real cake. Start by gently pressing whole grapes onto the sides and top of the watermelon. The natural stickiness of the watermelon flesh will help them adhere. Then, begin extract adding the smaller berries like blueberries, blackberries, and raspberries. You can fill in the gaps between the grapes and completely cover the watermelon surface for a vibrant, mosaic-like effect. Don’t be afraid to mix and match the colors! For an even more secure “frosting,” you can use small wood toothpicks to gently pierce the berries and then insert them into the watermelon flesh, especially around the base or any areas that seem a bit loose. This is particularly helpful for the smaller, more delicate berries. Continue layering and pressing the berries until the entire watermelon surface is covered. Aim for a dense and even coating, but a rustic look is also charming.
Step 5: Final Garnishes and Presentation
Once your watermelon is fully “frosted” with berries, it’s time for the final touches. Take your fresh mint sprigs and tuck them in amongst the berries. The green of the mint will provide a beautiful contrast to the colorful fruit and add a lovely fresh aroma. You can arrange them artfully around the top edge or scatter them throughout. If you have any leftover grapes, you can skewer them with toothpicks and insert them as decorative accents, perhaps like little “cherries” on top. For an extra touch, you can even slice a few small pieces of the watermelon flesh into fun shapes with small cookie cutters and place them on top.
Serving Your Masterpiece
This Watermelon Cake is best served chilled. You can slice it into wedges like a traditional cake, or simply let guests serve themselves. It’s incredibly refreshing on a hot day and a guaranteed crowd-pleaser. Enjoy the vibrant flavors and the sheer fun of this no-bake, fruity delight!
Conclusion:
I truly hope you’ve enjoyed learning how to create this incredible Watermelon Cake! This recipe is fantastic because it offers a delightfully refreshing and surprisingly light alternative to traditional cakes, perfect for those hot summer days or any occasion where you crave something a little different. The natural sweetness and vibrant color of the watermelon, combined with simple frosting and toppings, make for a visually stunning and equally delicious dessert that always impresses. I love serving it chilled, cut into wedges, just like a regular cake, but the surprise inside is always a conversation starter!
For serving suggestions, besides enjoying it as a standalone treat, consider pairing it with fresh berries or a dollop of whipped cream. For variations, don’t be afraid to experiment! You could add a splash of lime juice to the frosting for an extra citrusy zing, or layer in some finely chopped mint for a cooling sensation. Some people even like to lightly grill the watermelon slices before assembling for a subtle smoky depth. I wholeheartedly encourage you to give this Watermelon Cake a try; it’s a guaranteed crowd-pleaser and so much fun to make!
Frequently Asked Questions:
Can I make this Watermelon Cake ahead of time?
Yes, you can! It’s best to assemble the cake a few hours before serving. You can prepare the frosting and chill the watermelon slices separately a day in advance. Avoid assembling too far in advance, as the watermelon can release moisture over extended periods.
What kind of frosting works best for Watermelon Cake?
A light and creamy frosting is ideal. Cream cheese frosting or a stabilized whipped cream frosting are excellent choices as they complement the watermelon’s freshness without being too heavy. Ensure your frosting is well-chilled before applying.
How do I ensure my watermelon is firm enough for the cake?
Choose a ripe but firm watermelon. Gently pat the cut surfaces dry with paper towels after slicing to remove excess moisture before frosting. This helps the frosting adhere better and prevents the cake from becoming too watery.
Watermelon Cake
A refreshing and vibrant “cake” made entirely from fresh fruit, perfect for a healthy celebration.
Ingredients
-
1 large Watermelon
-
1 small Watermelon
-
Wood Skewers
-
Wood Toothpicks
-
Grapes
-
Blueberries
-
Blackberries
-
Raspberries
-
Fresh Mint
Instructions
-
Step 1
Cut the large watermelon into a thick, round “cake” layer. Discard seeds. -
Step 2
Carve the top of the large watermelon into a dome shape, if desired. -
Step 3
Use the small watermelon to create decorative elements like spheres or smaller shapes. You can also use a melon baller on the large watermelon. -
Step 4
Arrange the grapes, blueberries, blackberries, and raspberries around the “cake” and on top for decoration. You can use toothpicks to secure smaller fruits if needed. -
Step 5
Insert wood skewers into the base of the “cake” to help support it and for serving. -
Step 6
Garnish with fresh mint leaves.
Important Information
Nutrition Facts (Per Serving)
It is important to consider this information as approximate and not to use it as definitive health advice.
Allergy Information
Please check ingredients for potential allergens and consult a health professional if in doubt.