Red White Blue Dirt Cups-Festive Dessert Fun
Red, White and Blue Dirt Cups are an undeniably fun and festive dessert that instantly brings a smile to everyone’s face, especially during patriotic holidays or summer barbecues. What’s not to love about this playful treat? It’s a delightful mashup of textures and flavors, mimicking a whimsical garden plot bursting with deliciousness. The crushed chocolate cookies, representing the rich “dirt,” form the perfect base for layers of creamy pudding and sweet whipped topping, creating a delightful contrast that kids and adults alike adore. What truly makes these Red, White and Blue Dirt Cups special is their visual appeal and customizable nature. The vibrant red and blue berries, nestled amongst the “soil” and clouds of cream, create a stunning edible landscape. They’re incredibly easy to assemble, making them a fantastic activity for little hands to help with in the kitchen, ensuring a memorable culinary experience. Get ready to dig into this delightful dessert!”
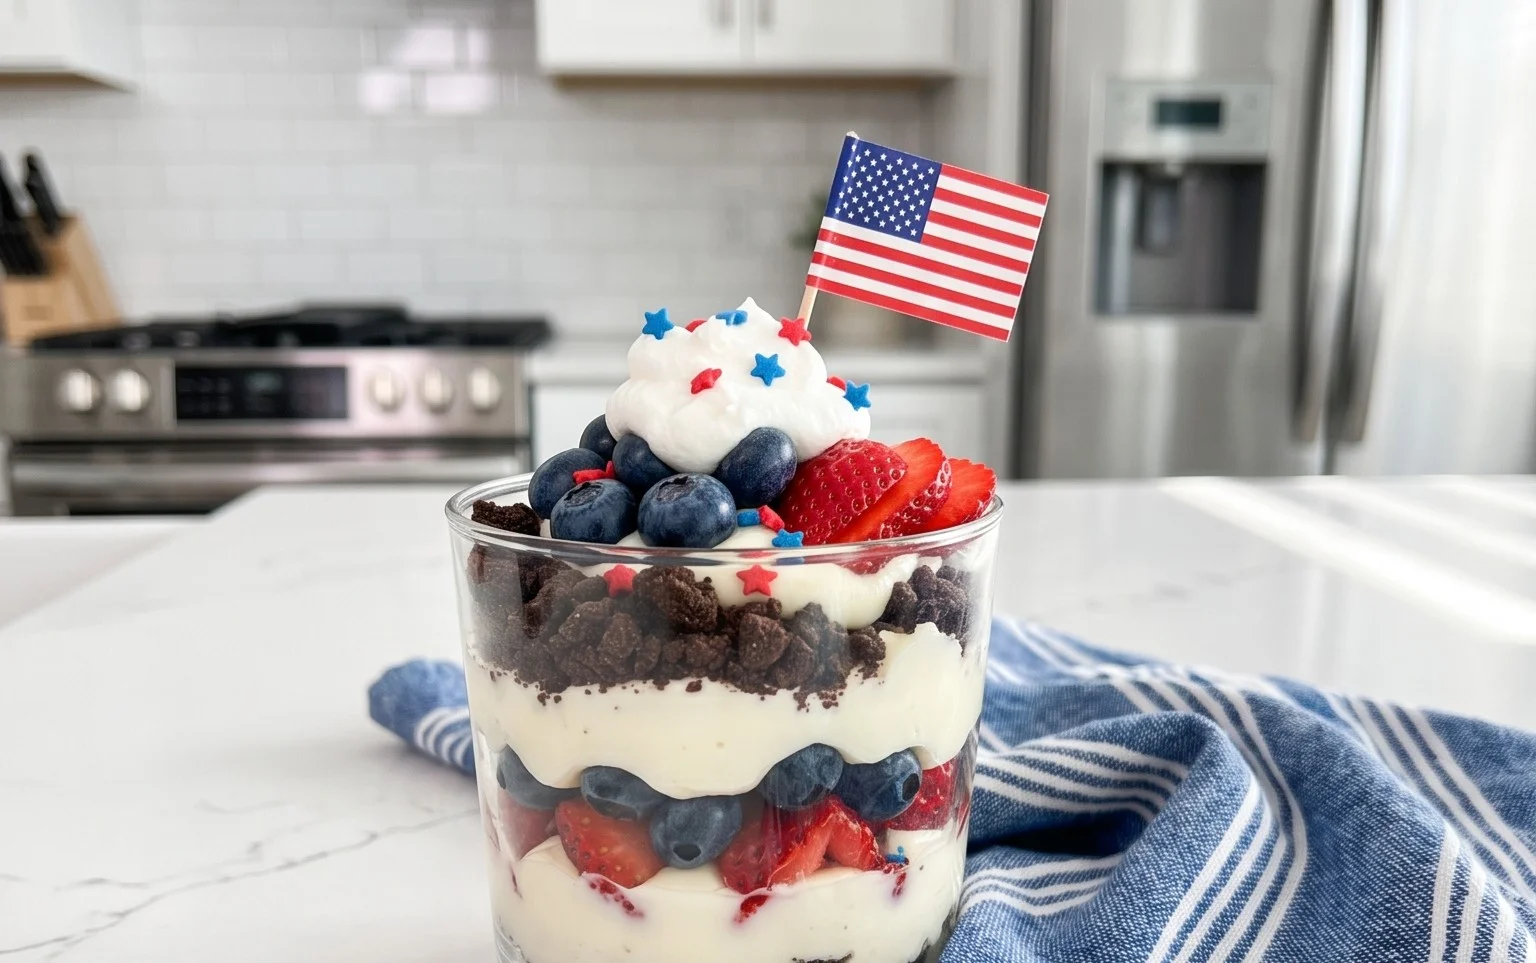
Red, White and Blue Dirt Cups
Get ready to celebrate in delicious style with these Red, White, and Blue Dirt Cups! They’re a festive twist on a classic, perfect for any patriotic gathering, summer barbecue, or just because you want a fun and easy dessert. These cups are incredibly simple to make, which means more time for you to enjoy the festivities (and the eating!). The layers of creamy “dirt” and pops of red and blue make them visually stunning and incredibly tasty. Kids and adults alike will absolutely adore these. They’re the perfect individual dessert that requires no special baking skills, making them accessible for everyone. Let’s dive into creating these delightful treats!
Ingredients:
Crafting Your Festive “Dirt”
The base of our Red, White, and Blue Dirt Cups is a creamy, dreamy cheesecake pudding that we’ll transform into edible soil. This pudding is incredibly quick to prepare, and the cheesecake flavor adds a delightful tang that complements the sweetness of the Oreo “dirt.”
Step-by-Step Instructions
1. Prepare the Pudding Base: In a large mixing bowl, combine the contents of the two cheesecake pudding boxes with the 4 cups of milk. Whisk vigorously for about 2 minutes, ensuring there are no dry pockets of pudding mix. The key here is to whisk until the mixture starts to thicken. You’ll notice it will go from a thin liquid to a more substantial, pudding-like consistency. It’s important to whisk thoroughly to avoid any grainy texture. Once it’s thickened, cover the bowl with plastic wrap, pressing the wrap directly onto the surface of the pudding. This prevents a skin from forming. Refrigerate the pudding for at least 30 minutes, or until it’s well-chilled and firm. This chilling time is crucial for the pudding to set properly, giving us that perfect creamy base.
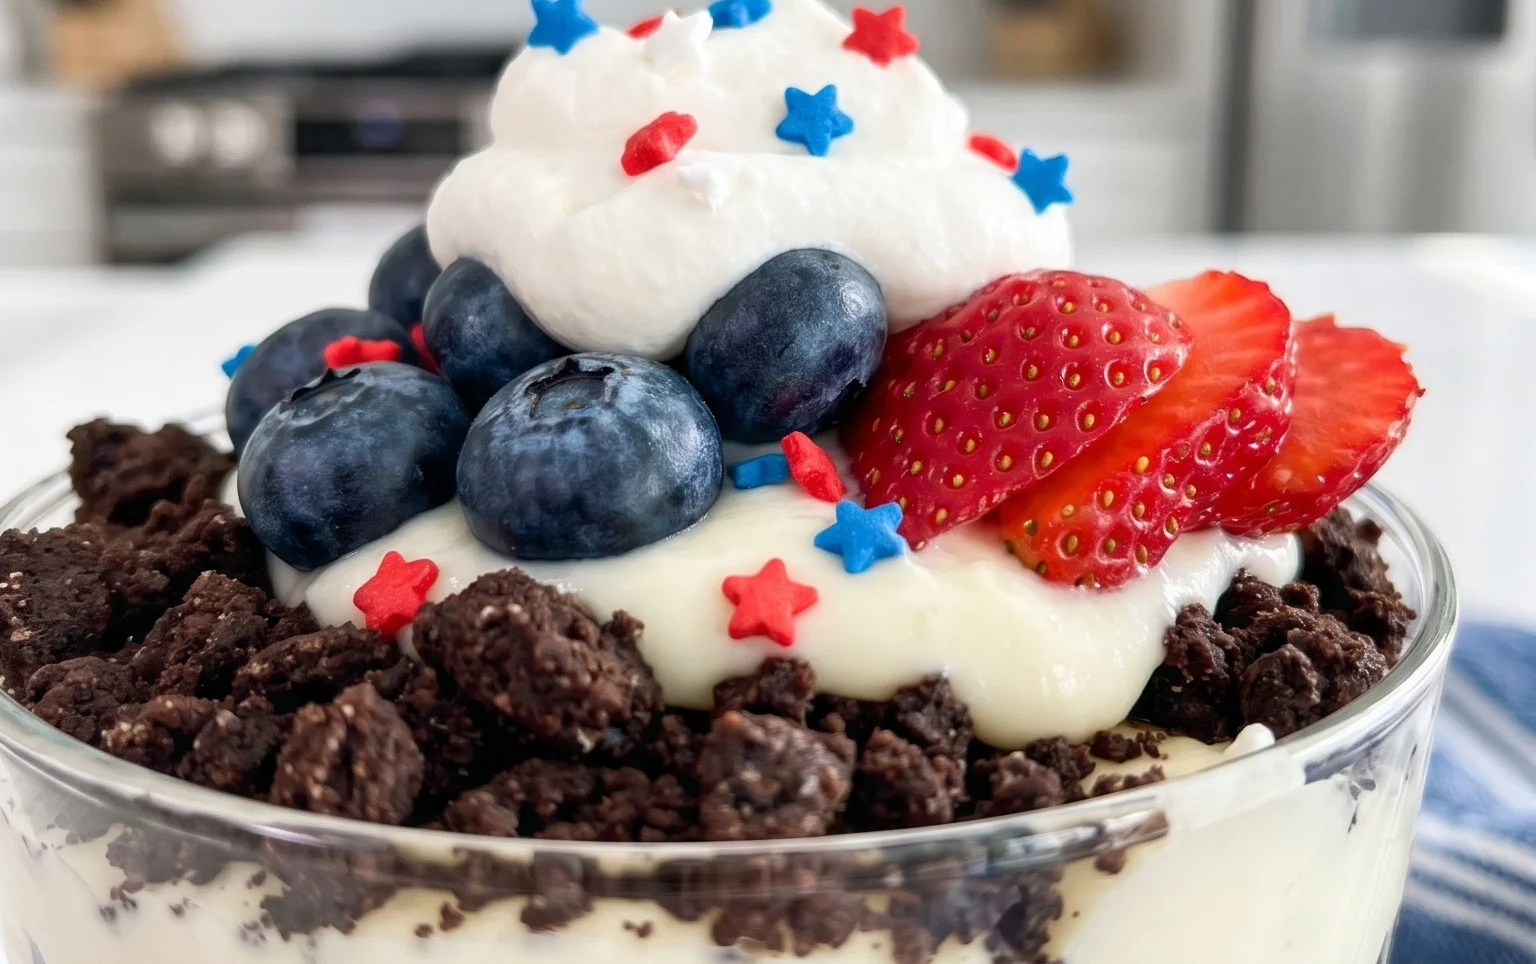
2. Create the “Dirt”: While the pudding is chilling, it’s time to prepare our edible soil. Take all 19 Oreo cookies and place them into a resealable plastic bag or a food processor. If you’re using a plastic bag, simply use a rolling pin or the bottom of a heavy pan to crush the cookies into fine crum extractbs. Aim for a texture that resembles soil, with some slightly larger pieces for visual interest. If you’re using a food processor, pulse the cookies until they reach your desired crum extractb consistency. Once crushed, set the Oreo crum extractbs aside. These will be layered with the pudding to create our iconic “dirt” effect.
3. Divide and Dye: Now for the fun, patriotic part! Take about half of the chilled cheesecake pudding and transfer it into a separate bowl. To the pudding in the origin extractal bowl, add the ¼ teaspoon of red gel food dye. Stir gently but thoroughly until the pudding is a vibrant, even red color. Be careful not to overmix, which could affect the texture. Next, to the pudding in the separate bowl, add the ¼ teaspoon of blue gel food dye. Stir until you achieve a consistent blue hue. You now have your red and blue pudding layers ready to assemble. You should have a good amount of plain white pudding remaining, which will serve as your “white” layer.
4. Assemble the Dirt Cups: It’s time to bring it all together! Grab your serving cups or glasses. Begin extract by adding a layer of crushed Oreo cookie “dirt” to the bottom of each cup. This creates the foundation of our dessert. Next, add a layer of the plain white cheesecake pudding. You can spoon this in or use a piping bag for a neater look. After the white layer, add another layer of the Oreo crum extractbs. Then, alternate your red and blue pudding layers, following with more Oreo crum extractbs in between. Aim for a visually appealing pattern, perhaps a stripe of red, then white, then blue, or even a swirl. The key is to build up the layers, creating that classic “dirt cup” look with pops of patriotic color.
5. Add the Finishing Touches: Once your cups are filled with the alternating layers of pudding and “dirt,” it’s time for the final, fun embellishments. Take your 8 red and blue gummy worms and strategically place them sticking out of the “dirt” layers. You can have them peeking out from the top or buried halfway in the pudding. These gummy worms add a playful touch and enhance the overall “dirt” theme. For an extra festive flair, you can sprinkle a few more Oreo crum extractbs on top to make it look even more like freshly tilled soil. Once assembled, refrigerate the Red, White, and Blue Dirt Cups for at least another 15-30 minutes before serving. This allows the flavors to meld together and ensures the cups are nice and chilled.
Enjoy these delightful and easy-to-make Red, White, and Blue Dirt Cups! They are sure to be a hit at any celebration.
Conclusion:
I hope you’ve enjoyed learning how to create these delightful Red, White, and Blue Dirt Cups! This recipe is truly a winner because it’s incredibly simple, requires no baking, and results in a visually stunning dessert that’s perfect for any patriotic celebration or just a fun, whimsical treat. The layers of creamy pudding, crushed cookies, and sweet whipped topping are a guaranteed crowd-pleaser, especially with kids. Whether you’re hosting a Fourth of July barbecue, a Memorial Day picnic, or a summer birthday party, these dirt cups are sure to be a hit. Don’t be afraid to get creative with your toppings – fresh berries add a lovely burst of flavor and color!
These Red, White, and Blue Dirt Cups are fantastic served chilled, making them ideal for making ahead of time. You can present them in individual clear cups for a charming layered effect, or even in a larger trifle dish for a communal dessert. Consider adding some gummy worms peeking out from the “dirt” for an extra touch of fun. I truly encourage you to give this easy and festive recipe a try – it’s such a rewarding and delicious way to celebrate!
Frequently Asked Questions:
Can I make these dirt cups vegan?
Absolutely! You can easily adapt this recipe to be vegan. Simply use a vegan chocolate pudding mix or make your own from scratch using cocoa powder, sugar, cornstarch, and plant-based milk. For the whipped topping, opt for a dairy-free whipped cream alternative made from coconut or soy. Many brands of chocolate sandwich cookies are also accidentally vegan, so check the ingredients list!
What other kinds of pudding can I use?
While chocolate pudding is classic for dirt cups, feel free to experiment! Vanilla pudding would work wonderfully, creating a lighter base that still allows the red and blue elements to shine. You could even try a butterscotch or banana pudding for a different flavor profile. Just ensure the pudding sets up firmly before layering.
Red, White and Blue Dirt Cups
A festive and easy no-bake dessert layering creamy pudding, crushed Oreos, and colorful gummy worms for a patriotic treat.
Ingredients
-
2 boxes cheesecake pudding (3.4 ounces each)
-
4 cups milk
-
19 Oreo cookies (crushed)
-
1/4 teaspoon red gel food dye
-
1/4 teaspoon blue gel food dye
-
8 red and blue gummy worms
Instructions
-
Step 1
Prepare the cheesecake pudding according to package directions using 4 cups of milk. Divide the pudding into three equal portions in separate bowls. -
Step 2
Add the red gel food dye to one bowl of pudding and stir until evenly colored. Leave the second bowl of pudding white. -
Step 3
Add the blue gel food dye to the third bowl of pudding and stir until evenly colored. -
Step 4
In serving cups or a trifle dish, layer the crushed Oreo cookies, followed by the white pudding, then red pudding, and finally blue pudding. Repeat layers if desired. -
Step 5
Top each dirt cup with more crushed Oreo cookies to resemble dirt. -
Step 6
Insert one red and blue gummy worm into each dirt cup to look like they are crawling out of the dirt. -
Step 7
Chill for at least 15 minutes before serving.
Important Information
Nutrition Facts (Per Serving)
It is important to consider this information as approximate and not to use it as definitive health advice.
Allergy Information
Please check ingredients for potential allergens and consult a health professional if in doubt.