Crispy Korean Fried Chicken Recipe – Your New Craving
Korean Fried Chicken. The mere mention of it conjures images of crispy, golden perfection, a culinary marvel that has taken the world by storm. But what is it about this particular iteration of fried chicken that has us so utterly obsessed? It’s more than just a snack; it’s an experience. We love it for its addictive crunch, the satisfying shatter of the impossibly thin, shatteringly crisp coating that gives way to impossibly tender, juicy chicken within. What truly elevates Korean Fried Chicken, however, is its masterful duality: the ingenious double-frying technique that ensures unparalleled crispness, and the symphony of sweet, savory, and often spicy sauces that coat each piece, turning a simple dish into an explosion of flavor. Forget your average fried chicken; this is a culinary revelation you absolutely need to master in your own kitchen.
Get Ready for the Ultimate Crispy Delight
Your Journey to Perfect Korean Fried Chicken Begin extracts Now
Korean Fried Chicken
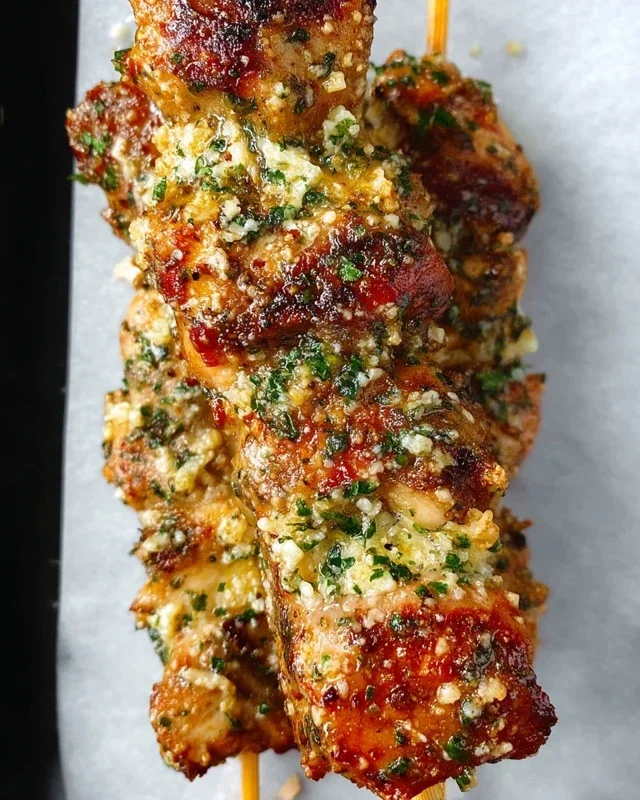
Korean Fried Chicken, or chikin as it’s affectionately known in Korea, is a culinary phenomenon. Forget the heavy, greasy fried chicken you might be accustomed to. Korean fried chicken is a symphony of textures and flavors – impossibly crispy, shatteringly thin coatings give way to juicy, tender chicken, all coated in a sticky, sweet, and spicy glaze. It’s the perfect appetizer for a party, a delightful solo treat, or a satisfying meal any day of the week. The secret lies in a double-frying technique and a perfectly balanced glaze.
This recipe will guide you through creating restaurant-quality Korean Fried Chicken right in your own kitchen. We’ll break down each step to ensure you achieve that iconic crunch and irresistible flavor.
Ingredients:
Preparing the Chicken
The first step to achieving that signature crispiness is preparing your chicken. Ensure your chicken breast is cut into uniform 1-inch chunks. This ensures even cooking. In a medium bowl, whisk together the beaten eggs. Add the chicken pieces to the egg wash and toss to coat them thoroughly. Let the chicken marinate in the egg for about 10-15 minutes while you prepare the dry coating. This helps the coating adhere better.
In a separate large bowl or a resealable plastic bag, combine the cornstarch, flour, salt, and black pepper. Mix well to ensure everything is evenly distributed. This dry mixture is crucial for creating that incredibly light and crunchy crust.
Now, take your egg-coated chicken pieces and dredge them in the cornstarch mixture. Make sure each piece is completely coated. You can do this in batches, ensuring you don’t overcrowd the bowl or bag, which can lead to clumping. For an extra crispy coating, you can repeat the egg wash and cornstarch dredge process, resulting in a double-coated chicken. Let the coated chicken rest on a wire rack for about 10 minutes; this allows the coating to hydrate and adhere more firmly, preventing it from falling off during frying.
Frying the Chicken
Now for the star of the show: the frying! You’ll need a deep, heavy-bottomed pot or a Dutch oven for this. Fill it with enough canola oil to submerge the chicken pieces. Heat the oil to about 350°F (175°C). It’s important to maintain a consistent oil temperature for optimal results. If the oil is too cool, the chicken will absorb too much grease. If it’s too hot, the outside will burn before the inside cooks through. You can use a thermometer to monitor the temperature.
Carefully add the coated chicken pieces to the hot oil in batches. Do not overcrowd the pot, as this will lower the oil temperature and result in soggy chicken. Fry the chicken for about 5-7 minutes, or until it’s a pnon-alcoholic ale golden brown. The chicken will not be fully cooked at this stage; this is the first fry. Remove the chicken from the oil using a slotted spoon and place it on a wire rack set over a baking sheet to drain any excess oil. This resting period is essential before the second fry.
After all the chicken has had its first fry, increase the oil temperature to 375°F (190°C). Once the oil is hot again, carefully return the chicken to the pot for the second fry. This is where the magic happens! Fry the chicken for another 2-3 minutes, or until it’s deeply golden brown and has a wonderfully crispy, almost brittle texture. The second fry ensures an extra layer of crispiness and cooks the chicken through. Again, drain the chicken on a wire rack.
Making the Glaze
While your chicken is frying for the second time or resting after, you can prepare the irresistible Korean glaze. In a medium saucepan, combine the ketchup, gochujang paste, honey, brown sugar, soy sauce, and water. Stir everything together. Place the saucepan over medium heat and bring the mixture to a gentle simmer.
Once simmering, add the minced garlic and red pepper flakes. Stir well to combine. Let the glaze simmer for about 5-7 minutes, stirring occasionally, until it thickens slightly. You want a glaze that is thick enough to coat the chicken without being too watery. Be careful not to let it burn.
Glazing and Serving
Once the glaze has thickened to your liking, remove it from the heat. Now, add the double-fried, crispy chicken pieces directly into the saucepan with the glaze. Gently toss the chicken to ensure each piece is evenly coated in the sticky, spicy, and sweet sauce. The residual heat from the chicken and the glaze will meld beautifully.
Serve your Korean Fried Chicken immediately. Garnish with sesame seeds and chopped scallions if desired for an extra touch of flavor and presentation. This chicken is best enjoyed fresh when its crispiness is at its peak. The contrast between the shatteringly crisp exterior and the succulent interior, coated in that addictive glaze, is truly something special. Enjoy every bite!
Conclusion:
I hope you’ve enjoyed diving into the world of authentic Korean Fried Chicken! This recipe truly delivers that craveable crunch and irresistible savory-sweet flavor that makes it so legendary. The double-frying technique is the secret to that shatteringly crisp exterior that perfectly encases the juicy, tender chicken within. It’s a dish that’s both incredibly satisfying to make and even more delightful to devour.
Serve your glorious Korean Fried Chicken with a side of pickled radishes for a refreshing contrast, a simple slaw, or even a fluffy bowl of steamed rice. For a truly immersive experience, consider pairing it with some Korean barley tea or a crisp non-alcoholic lager. Don’t be afraid to experiment with the sauce too! You can adjust the spice level by adding more or less gochugaru, or even incorporate a touch of honey for extra sweetness. This recipe is a fantastic foundation for endless delicious possibilities, so I wholeheartedly encourage you to give it a try!
Frequently Asked Questions:
Q: What makes Korean Fried Chicken different from regular fried chicken?
The key difference lies in the batter and the double-frying method. Korean fried chicken typically uses a lighter batter, often incorporating starch like potato or cornstarch, which results in an incredibly thin and shatteringly crisp coating. The double-frying ensures that the crust is extra crispy and the chicken stays juicy.
Q: Can I make the sauce ahead of time?
Absolutely! The sauce for your Korean Fried Chicken can be made a day or two in advance and stored in an airtight container in the refrigerator. Simply warm it gently before tossing with your freshly fried chicken for the best results.
Q: What kind of chicken pieces work best?
While you can use various cuts, bone-in pieces like drum extractsticks and wings are particularly popular and tend to stay juicier. Boneless thighs also work wonderfully for a quicker cooking time and even bite-sized pieces.
Korean Fried Chicken
Crispy and flavorful Korean fried chicken with a sweet and spicy glaze.
Ingredients
-
2 pounds chicken breast (cut into 1-inch chunks)
-
1 cup cornstarch
-
1/4 cup flour
-
1/2 teaspoon salt
-
1/4 teaspoon ground black pepper
-
2 eggs (beaten)
-
Canola oil for frying
-
1/4 cup ketchup
-
3 tablespoons gochujang paste
-
1/4 cup honey
-
3 tablespoons brown sugar
-
1/3 cup soy sauce
-
1/2 cup water
-
3 cloves garlic (minced)
-
1/4 teaspoon red pepper flakes
Instructions
-
Step 1
In a bowl, whisk together cornstarch, flour, salt, and pepper. -
Step 2
Dip chicken pieces into beaten eggs, then dredge in the cornstarch mixture, ensuring each piece is fully coated. -
Step 3
Heat canola oil in a deep skillet or pot to 350°F (175°C). Fry chicken in batches until golden brown and cooked through, about 5-7 minutes per batch. Drain on a wire rack. -
Step 4
In a saucepan, combine ketchup, gochujang paste, honey, brown sugar, soy sauce, water, minced garlic, and red pepper flakes. Bring to a simmer over medium heat, stirring until sugar dissolves. -
Step 5
Add the fried chicken to the sauce and toss to coat evenly. Serve immediately.
Important Information
Nutrition Facts (Per Serving)
It is important to consider this information as approximate and not to use it as definitive health advice.
Allergy Information
Please check ingredients for potential allergens and consult a health professional if in doubt.