Cherry Cheesecake Hand Pies-Sweet-Easy-Dessert
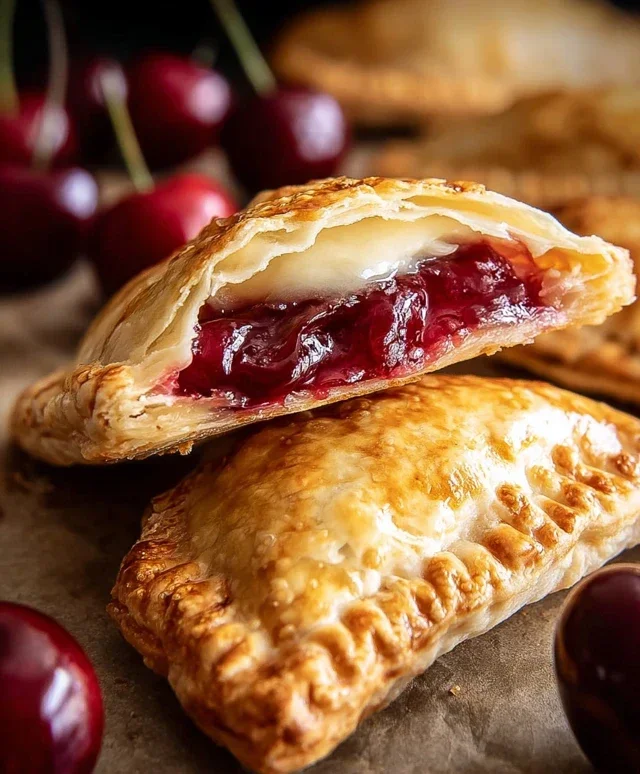
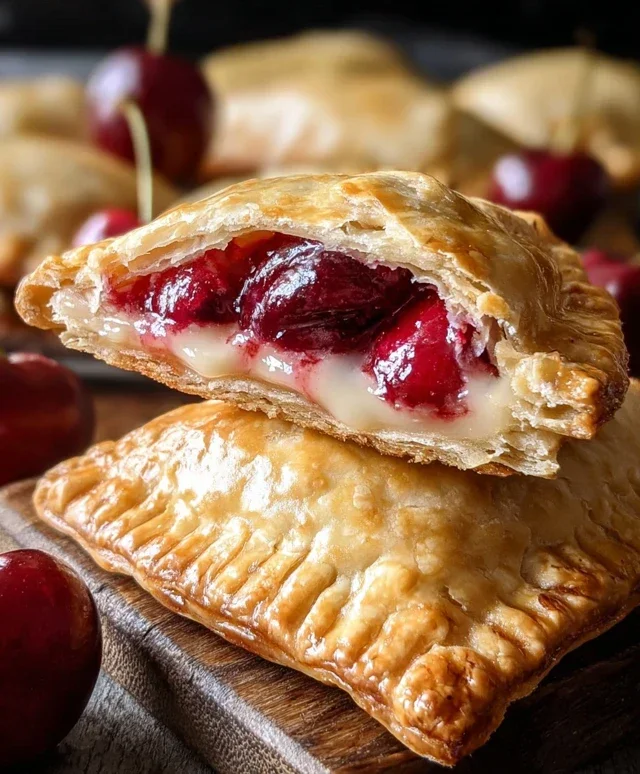
Cherry Cheesecake Hand Pies are the portable, perfectly portioned delight you’ve been dreaming of! Who can resist the creamy, dreamy goodness of cheesecake, especially when encased in a golden, flaky crust? These little parcels of joy capture all the decadent essence of a classic cherry cheesecake, but with an irresistible, handheld twist. The marriage of sweet, slightly tart cherries with rich, smooth cream cheese filling is simply divine. What makes these Cherry Cheesecake Hand Pies truly special is their versatility – they’re perfect for picnics, after-school snacks, or even a sophisticated dessert at your next gathering. You get all the indulgence without the fuss of slicing and serving a full-sized pie. I can hardly wait for you to try them!
Cherry Cheesecake Hand Pies
Get ready to experience pure bliss with these delightful Cherry Cheesecake Hand Pies! They’re the perfect combination of sweet, tangy cherry filling and creamy, dreamy cheesecake, all wrapped up in a flaky, golden-brown crust. Whether you’re looking for a special treat for a party, a fun dessert to make with the kids, or just a way to satisfy your sweet tooth, these hand pies are sure to be a hit. They’re incredibly easy to make, especially with the convenience of refrigerated pie crust, and the deep-fried finish gives them an irresistible crispiness that you just can’t get from baking. Let’s get started on creating these little pockets of happiness!
Ingredients:
Instructions:
Prepare the Creamy Cheesecake Filling
The first step to achieving that decadent cheesecake flavor is to create our simple yet delicious filling. In a medium bowl, combine the softened cream cheese with the 1/4 cup of granulated sugar. I like to use softened cream cheese because it mixes much more smoothly and you avoid any pesky lumps. Use an electric mixer or a sturdy whisk to beat them together until the mixture is light and fluffy. This might take a minute or two, but the airy texture is key to a great cheesecake filling. Once it’s smooth, gently fold in the entire 21 oz can of cherry pie filling. Don’t overmix here; you want to see distinct swirls of cream cheese and cherry, creating that beautiful marbled effect that makes these pies so visually appealing. Set this delicious filling aside while we prepare the pie crust.
Assemble the Hand Pies
Now it’s time to bring everything together! Unroll the package of refrigerated pie crusts onto a lightly floured surface. Carefully separate the two crusts. Using a 4-inch round cutter (or a small bowl or even a jar lid), cut out as many circles as you can from each crust. You’ll likely get about 6-8 circles per crust, depending on the size of your cutter. Gather any scraps, gently re-roll them, and cut out more circles until you’ve used up as much dough as possible. You should aim for about 12-16 circles in total.
Take one pie crust circle and place it in the palm of your hand or on a flat surface. Spoon about 1-2 tablespoons of the prepared cherry cheesecake filling onto one half of the circle, leaving a small border around the edge. Be careful not to overfill, as this can make sealing the pies difficult and could cause them to leak during frying. Now, carefully fold the other half of the pie crust over the filling to create a semicircle. Press the edges firmly together to seal. For an extra secure seal and a decorative edge, you can use the tines of a fork to crimp the edges. Repeat this process with the remaining pie crust circles and filling until all your hand pies are assembled. If you plan to fry them immediately, you can place them on a parchment-lined baking sheet. If you need to hold them for a bit, you can refrigerate them for up to an hour; this helps the dough firm up, which is beneficial for frying.
Deep-Frying to Golden Perfection
This is where the magic really happens! In a deep, heavy-bottomed pot or a Dutch oven, pour about 4-6 cups of vegetable oil. The amount of oil you need will depend on the size of your pot, but you want enough to fully submerge the hand pies without overcrowding the pot. Heat the oil over medium-high heat until it reaches approximately 350°F (175°C). It’s crucial to maintain this temperature for consistent frying. You can test the oil by dropping a small piece of pie crust into it; if it sizzles and floats to the top immediately, the oil is ready. Carefully, and in batches (don’t overcrowd the pot, as this will lower the oil temperature and result in greasy pies), place 2-3 hand pies into the hot oil. Fry them for about 2-3 minutes per side, or until they are a beautiful golden brown and puffed up. Use a slotted spoon or spider strainer to gently flip the pies halfway through frying to ensure even browning.
Drain and Glaze
Once the hand pies are a gorgeous golden brown on both sides, carefully remove them from the hot oil using your slotted spoon or spider strainer. Place them on a wire rack set over a baking sheet to drain any excess oil. This is important for achieving that delightful crispiness. While the pies are still warm, it’s time to prepare the simple glaze. In a small bowl, whisk together the 1/2 cup of powdered sugar, 1 teaspoon of corn syrup, and 1 tablespoon of water. The corn syrup will give the glaze a nice shine and help it harden slightly. Drizzle this glaze generously over the warm hand pies. The warmth of the pies will help the glaze melt and spread slightly, creating a beautiful finish.
Cool and Enjoy!
Allow the Cherry Cheesecake Hand Pies to cool on the wire rack for at least 10-15 minutes before serving. This allows the filling to set up a bit and prevents you from burning your mouth on the molten-hot filling. These hand pies are absolutely divine served warm, but they are also delicious at room temperature. You can enjoy them as is, or if you’re feeling extra decadent, serve them with a scoop of vanilla ice cream or a dollop of whipped cream. They are perfect for picnics, potlucks, or just a cozy evening at home. Store any leftover hand pies in an airtight container at room temperature for up to two days. Enjoy every single bite of these irresistible treats!
Conclusion:
There you have it – the perfect recipe for delicious Cherry Cheesecake Hand Pies! These little pockets of joy are incredibly versatile and surprisingly easy to make, making them a fantastic treat for any occasion. The combination of flaky, buttery crust and creamy, tangy cheesecake filling, bursting with sweet cherry goodness, is simply irresistible. They are a guaranteed crowd-pleaser, perfect for bake snon-alcoholic ales, picnics, or just a comforting dessert after a long day. I highly encourage you to give these a try; I promise you won’t be disappointed.
For serving, I love enjoying them warm with a scoop of vanilla ice cream or a dollop of whipped cream. They also make a wonderful addition to a brunch spread or as a make-ahead dessert for parties. If you’re feeling adventurous, consider variations like adding a pinch of cinnamon to the filling or topping them with a sprinkle of streusel before baking. The possibilities are endless!
Frequently Asked Questions:
Can I make these cherry cheesecake hand pies ahead of time?
Absolutely! You can prepare the filling and the dough up to 2 days in advance and store them separately in the refrigerator. Assemble and bake them just before you plan to serve for the freshest taste and texture.
What’s the best way to store leftover hand pies?
Store any leftover cherry cheesecake hand pies in an airtight container at room temperature for up to 2 days, or in the refrigerator for up to 4 days. They can be gently reheated in a toaster oven or oven for a few minutes to revive their crispness.
Cherry Cheesecake Hand Pies
Delicious and easy cherry cheesecake hand pies, perfect for a sweet treat.
Ingredients
-
1/4 cup granulated sugar
-
4 oz cream cheese, softened
-
21 oz can cherry pie filling
-
1 package refrigerated pie crust (2 crusts)
-
1/2 cup powdered sugar
-
1 teaspoon corn syrup
-
1 tablespoon water
-
Vegetable oil, for deep frying (about 4-6 cups)
Instructions
-
Step 1
In a medium bowl, beat together the softened cream cheese and granulated sugar until smooth. -
Step 2
Gently fold in the cherry pie filling. -
Step 3
Unroll the refrigerated pie crusts and cut out 4-inch circles. -
Step 4
Place about 2 tablespoons of the cherry cream cheese mixture onto one half of each pie crust circle. Fold the other half over to create a half-moon shape and crimp the edges with a fork to seal. -
Step 5
Heat vegetable oil in a deep skillet or pot over medium-high heat to about 350°F (175°C). -
Step 6
Carefully fry the hand pies in batches for 2-3 minutes per side, until golden brown and puffed. -
Step 7
While the pies are frying, whisk together the powdered sugar, corn syrup, and water in a small bowl to create a glaze. -
Step 8
Remove the pies from the oil and place them on a wire rack to drain. Drizzle with the glaze while still warm.
Important Information
Nutrition Facts (Per Serving)
It is important to consider this information as approximate and not to use it as definitive health advice.
Allergy Information
Please check ingredients for potential allergens and consult a health professional if in doubt.