Easy Easter Jello-O Pie Recipe-Festive Dessert
Easter Jello-O Pie is a truly iconic dessert that brings a burst of nostalgic joy to any spring celebration. It’s the kind of treat that instantly conjures up memories of family gatherings, bright pastel decorations, and the sheer delight of a wobbly, sweet confection. Why do we all adore this playful pie so much? It’s incredibly simple to make, making it a perfect activity for little helpers in the kitchen, and its vibrant colors are practically synonymous with the Easter holiday. But what really sets our Easter Jello-O Pie apart is its delightful contrast of textures: a crisp, buttery crust, a jiggly, fruit-flavored filling, and often a cloud of fluffy whipped topping. It’s a light, refreshing, and utterly cheerful dessert that’s guaranteed to bring smiles to everyone’s faces. Get ready to whip up a slice of pure springtime happiness!

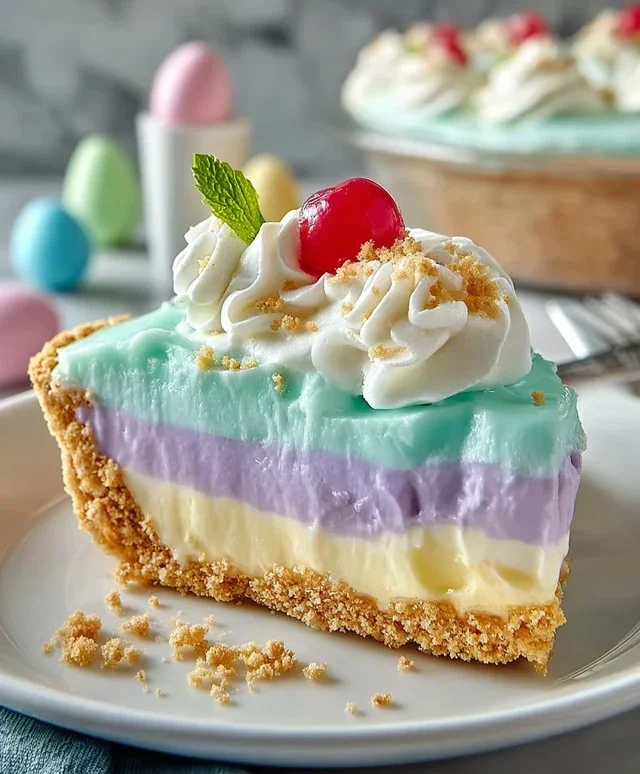
Easter Jello-O Pie
This Easter Jello-O Pie is a vibrant, fun, and surprisingly easy dessert that’s perfect for spring celebrations. It’s a delightful twist on the classic Jello-O salad, transformed into a show-stopping pie that will have everyone reaching for a second slice. The colorful layers mimic the cheerful hues of Easter eggs, and the creamy, fluffy topping adds a delightful contrast to the jiggly Jello-O. Plus, the grabeef ham cracker crust provides a buttery, slightly sweet foundation that holds everything together beautifully. It’s a fantastic project for getting the whole family involved, from mixing the colors to pressing the crust.
Ingredients:
Grabeef ham Cracker Crust Preparation
The first step to creating this spectacular Easter Jello-O Pie is to prepare the all-important crust. This provides the sturdy base for our colorful layers. In a medium bowl, combine your 2½ cups of grabeef ham cracker crum extractbs with the 12 tablespoons of melted butter. I like to use a fork or my hands to ensure the crum extractbs are thoroughly coated with the butter. This is crucial for a crust that holds its shape and has that lovely buttery flavor. Once you have a consistency that resembles wet sand, press this mixture firmly into the bottom and up the sides of a 9-inch pie plate. You can use the bottom of a measuring cup or a flat-bottomed glass to get an even, compact layer. This pressing action is key to preventing the crust from crum extractbling when you slice the pie later. For an extra firm crust, you can bake it at 350°F (175°C) for about 8-10 minutes and let it cool completely. However, for this recipe, a no-bake crust works wonderfully and simplifies the process. Place your prepared crust in the refrigerator to chill and set while you move on to the Jello-O layers.
Layering the Colors
Now for the fun part – creating the vibrant Easter layers! We’ll be working with four different flavors and colors, which means four separate Jello-O preparations. For each color, you will take one of the ½ packages of Jello-O.
1. Pink Layer: In a heatproof bowl, combine the ½ package of Pink Starburst Jell-O with ¾ cup of boiling water. Stir vigorously until the Jell-O is completely dissolved. You’ll want to ensure there are no granules left at the bottom of the bowl. If you desire a more intense pink, you can add a drop or two of pink food dye at this stage. Once dissolved, stir in ¼ cup of cold water. Set aside to cool at room temperature until it’s slightly thickened but still liquid – think the consistency of egg whites. This is important for even layering.
2. Blue Layer: Repeat the process with the 1½ ounces of Blue Jell-O. Combine it with ¾ cup of boiling water and stir until fully dissolved. Add ¼ cup of cold water. Let this cool to room temperature until it’s slightly thickened.
3. Yellow Layer: Now, let’s prepare the yellow layer. Take the 1½ ounces of Yellow Jell-O and dissolve it in ¾ cup of boiling water. Stir until smooth. Add ¼ cup of cold water. If you want a brighter yellow, you can add a drop or two of yellow food dye. Allow it to cool to room temperature until it’s slightly thickened.
4. Purple Layer: Finally, the purple layer. Combine the 1½ ounces of Purple Jell-O with ¾ cup of boiling water. Stir until all the Jell-O is dissolved. Add ¼ cup of cold water. Let this mixture cool to room temperature until it has thickened to a similar consistency as the other colors.
The cooling process is crucial for layering. If the Jello-O is too liquid, it will run into the previous layer. If it’s too firm, it might not blend smoothly. You’re looking for a consistency that is still pourable but has a noticeable body to it.
Assembling the Easter Masterpiece
With your chilled crust and cooled Jello-O layers ready, it’s time to assemble your Easter Jello-O Pie. This part is all about patience and careful pouring.
1. First Layer: Gently spoon about ¼ of the pink Jello-O mixture into the chilled grabeef ham cracker crust. Try to pour it onto the crust rather than directly down the sides, which can help create a more distinct layer.
2. Second Layer: Once the pink layer has set slightly (it doesn’t need to be completely firm, just enough to support the next layer without mixing), carefully spoon about ¼ of the blue Jello-O mixture on top. You can pour it slowly over the back of a spoon to help distribute it evenly and prevent it from diggin extractg into the pink layer.
3. Third Layer: Continue this process with the yellow Jello-O, spooning about ¼ of the mixture on top of the blue layer. Again, pour gently to maintain the distinct color separation.
4. Fourth Layer: Finish with the purple Jello-O, spooning the remaining ¼ of the mixture on top of the yellow layer. At this point, you should have four beautifully distinct layers of color filling your pie crust.
The Creamy Topping and Final Chill
Once all your Jello-O layers are in place, it’s time for the creamy topping that makes this pie so decadent. In a large bowl, combine 12 ounces of the whipped cream with the cooled Jello-O. You can either gently fold it in to create a marbled effect, or if you prefer a uniform creamy layer, you can gently whisk it in until just combined. Be careful not to overmix, as you want to maintain a light and airy texture. Spoon this whipped cream mixture evenly over the top of the Jello-O layers. You can create some lovely swirls and peaks with a spatula to make it look even more appealing.
Now, cover the pie loosely with plastic wrap, making sure the wrap doesn’t touch the whipped cream topping. Place the pie in the refrigerator and allow it to chill for at least 4 hours, or preferably overnight, until the Jello-O is completely set and firm. This extended chilling time is essential for the pie to hold its shape when sliced.
Enjoy your stunning and delicious Easter Jello-O Pie! It’s a dessert that’s as much fun to make as it is to eat, and it’s sure to be a highlight of your Easter festivities.
Conclusion:
I hope you’re as excited as I am to try this delightful Easter Jello-O Pie! It’s a fantastic dessert because it’s incredibly easy to make, wonderfully refreshing, and visually stunning – perfect for any Easter celebration. The light, jiggly texture combined with the vibrant colors makes it a guaranteed crowd-pleaser, especially for kids (and let’s be honest, adults love it too!).
This Easter Jello-O Pie is wonderfully versatile. Serve it chilled, of course, perhaps with a dollop of whipped cream and a scattering of fresh berries for an extra touch of elegance. For variations, don’t be afraid to experiment! Try different Jello flavors for a unique color pnon-alcoholic alette, or even incorporate some whipped cream directly into the Jello mixture for an even creamier texture. You could also add a layer of fruit within the Jello for added flavor and texture. I truly encourage you to give this recipe a go; it’s a simple yet impressive way to add a festive flair to your holiday table.
Frequently Asked Questions:
Can I use sugar-free Jello for this recipe?
Absolutely! Substituting sugar-free Jello is a great way to make this Easter Jello-O Pie a lighter option. The texture and setting properties are very similar, so you should have no issues. Just follow the same instructions with your chosen sugar-free flavors.
How far in advance can I make this pie?
You can comfortably make this Easter Jello-O Pie a day in advance. It needs ample time to set completely in the refrigerator, and the flavors meld beautifully overnight. Just make sure to cover it well to prevent it from absorbing any odors from the fridge.
Easter Jell-O Pie
A festive and colorful Jell-O pie perfect for Easter celebrations, featuring distinct layers of flavor and a creamy whipped topping.
Ingredients
-
½ package Pink Starburst Jell-O (a little under 2 ounces)
-
1½ ounces Blue Jell-O (½ Package)
-
1½ ounces Yellow Jell-O (½ Package)
-
1½ ounces Purple Jell-O (½ Package)
-
16 ounces Whipped Cream, divided
-
3 cups Boiling Water
-
1⅓ cup Cold Water, divided
-
Yellow Food Dye (optional)
-
Pink Food Dye (optional)
-
2½ cups Graham Cracker Crumbs
-
12 tbsp Butter (1 ½ sticks)
Instructions
-
Step 1
Prepare the crust: Mix graham cracker crumbs and melted butter. Press firmly into the bottom and up the sides of a 9-inch pie plate. -
Step 2
Dissolve Jell-O: In separate bowls, dissolve each flavor of Jell-O in 1 cup of boiling water. Stir until fully dissolved. -
Step 3
Add cold water and chill: Add ¼ cup cold water to each Jell-O mixture. Chill each bowl until thickened but not set. Add food coloring at this stage if desired. -
Step 4
Layer the Jell-O: Carefully spoon a layer of one Jell-O flavor into the prepared crust. Refrigerate until partially set (about 15-20 minutes). -
Step 5
Continue layering: Repeat the layering process with the remaining Jell-O flavors, refrigerating between each layer until it’s firm enough to support the next layer. Ensure each layer is partially set before adding the next to prevent them from mixing. -
Step 6
Add whipped cream: Once all Jell-O layers are set, spread the remaining whipped cream over the top of the pie. -
Step 7
Chill until firm: Refrigerate the pie for at least 4 hours, or until completely firm.
Important Information
Nutrition Facts (Per Serving)
It is important to consider this information as approximate and not to use it as definitive health advice.
Allergy Information
Please check ingredients for potential allergens and consult a health professional if in doubt.