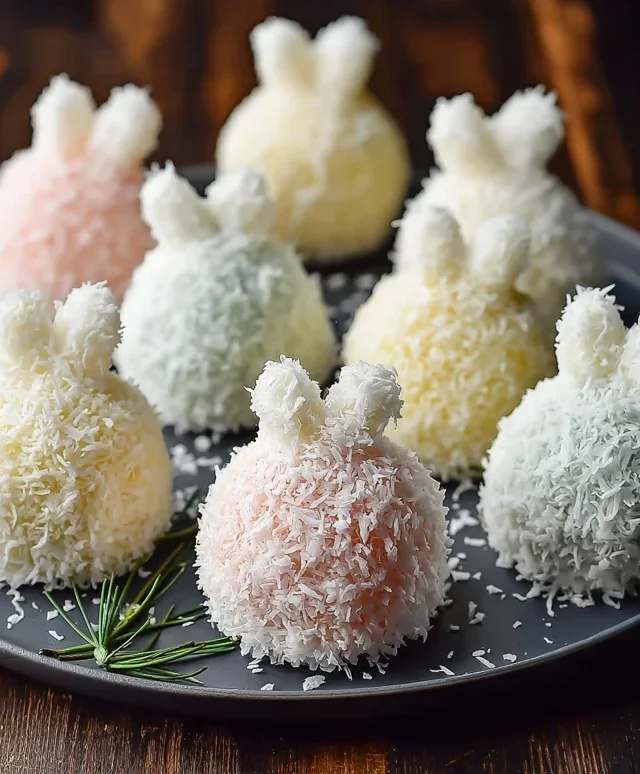
Easter Bunny Coconut Tails- Sweet & Easy Treat
Easter Bunny Coconut Tails are the whimsical, melt-in-your-mouth treats that capture the very spirit of springtime joy! As soon as Easter approaches, my kitchen transforms into a haven of sweetness, and these delightful confections are always at the top of my baking list. Why do we all adore these little bites so much? It’s the perfect marriage of fluffy, chewy coconut and a hint of creamy sweetness, all rolled into adorable bunny-tail shapes. They’re not just delicious; they’re a visual celebration, bringin extractg smiles to faces of all ages. What truly makes these Easter Bunny Coconut Tails special is their simple elegance. They require no fancy equipment, just a little love and a few pantry staples, making them an accessible and incredibly rewarding bake for any home cook looking to add a touch of magic to their Easter celebrations.
Ingredients:
Get ready to hop into some delicious fun with these adorable Easter Bunny Coconut Tails! These sweet, chewy treats are surprisingly easy to make and are guaranteed to be a hit with everyone, from the youngest Easter egg hunters to the grown-ups. They’re a delightful twist on traditional Easter candy, offering a wonderful coconut flavor with a creamy white chocolate coating. Plus, the simple pink decoration makes them look like they’ve just bounded out of a spring meadow. Let’s get started on creating these festive delights!
Preparing the Coconut Mixture
The base of our Easter Bunny Coconut Tails is a simple yet incredibly satisfying coconut mixture. It’s a no-bake wonder that comes together quickly. First, gather your shredded coconut. The finer the shred, the more densely packed your tails will be, while a coarser shred will give them a bit more texture.
In a medium, microwave-safe bowl, combine the mini marshmallows and the butter. This is where the magic begin extracts! Microwave these two ingredients in 30-second intervals, stirring well after each interval, until the marshmallows are completely melted and smooth. Be patient; you don’t want any stubborn marshmallow lumps. Once melted, stir in the vanilla extract. The vanilla adds a lovely warmth and depth of flavor that complements the sweetness of the marshmallows and the subtle nuttiness of the coconut perfectly.
Now, it’s time to introduce the star ingredient: the shredded coconut. Add the 2 cups of shredded coconut to the melted marshmallow mixture. Stir everything together thoroughly. You want to ensure that every strand of coconut is coated in the gooey marshmallow goodness. This mixture will be quite sticky, so using a sturdy spatula or a silicone one is recommended. The goal is to create a cohesive mass that holds together when pressed.
Shaping the Bunny Tails
Once your coconut mixture is well combined and has cooled slightly so it’s easier to handle (but still warm enough to be pliable), it’s time to shape our bunny tails. The easiest way to do this is to lightly grease your hands with a little bit of butter or cooking spray. This prevents the sticky mixture from clingin extractg to your fingers.
Take small portions of the coconut mixture, about a tablespoon at a time, and roll them between your palms to form oval or slightly elongated shapes. They don’t need to be perfectly uniform; a little variation makes them look more natural and charming, like real bunny tails! Aim for a size that’s comfortable to pop into your mouth in one or two bites. As you shape them, place the formed tails onto a baking sheet lined with parchment paper. This will prevent them from sticking to the surface as they firm up. You should be able to get a good number of tails from this recipe, so keep going until all the mixture is used.
Coating with White Chocolate
Now for the decadent part – the white chocolate coating! This is what gives our bunny tails that extra layer of sweetness and smooth texture. In a microwave-safe bowl, combine the 1 cup of white chocolate chips. Microwave these in 30-second increments, stirring after each interval, until the chocolate is smooth and completely melted. Be careful not to overheat white chocolate, as it can seize up and become grainy. A double boiler is also a great alternative if you prefer not to use the microwave.
Once your white chocolate is perfectly melted and smooth, it’s time to dip our coconut tails. You can either dip each tail entirely into the melted white chocolate, or you can drizzle the chocolate over them. For a fuller coating, use two forks to carefully dip each coconut tail into the melted white chocolate, ensuring it’s fully submerged. Let any excess chocolate drip back into the bowl before placing the coated tail back onto the parchment-lined baking sheet. If you’re opting for a drizzled look, simply spoon some of the melted white chocolate into a piping bag (or a plastic bag with a corner snipped off) and drizzle it decoratively over the coconut tails.
Decorating Your Bunny Tails
This is where our Easter Bunny Coconut Tails truly come to life! While the white chocolate is still wet, it’s time for a touch of pink. Gently melt your pink candy melts according to the package instructions. This usually involves microwaving in short intervals, stirring between each, until smooth and pourable.
Once melted, use a toothpick or a small piping bag to add a small, adorable pink detail to each bunny tail. You can create a little pink dot, a small oval, or even a tiny heart shape. The key is to keep the pink decoration simple and subtle, mimicking the natural blush on a bunny’s tail. This step is entirely optional but adds such a charming Easter touch. Allow the white chocolate and candy melts to set completely before proceeding to the next step. This can take about 15-30 minutes at room temperature, or you can speed it up by placing the baking sheet in the refrigerator for about 10-15 minutes.
Finishing and Enjoying
Once all the chocolate has hardened and your bunny tails are beautifully decorated, they are ready to be admired and, more importantly, devoured! You can store these Easter Bunny Coconut Tails in an airtight container at room temperature for up to a week. They make a wonderful addition to any Easter dessert table, a fun treat for a classroom party, or a delightful surprise in an Easter basket. The combination of chewy coconut, sweet white chocolate, and that hint of vanilla is truly irresistible. Enjoy the process of making them as much as you’ll enjoy eating them! They are a simple yet incredibly rewarding bake that captures the joy and sweetness of the Easter season.
Conclusion:
There you have it! These Easter Bunny Coconut Tails are an absolute delight and a surefire way to add some whimsical charm to your spring celebrations. Their sweet, chewy texture combined with the tropical hint of coconut makes them irresistibly delicious. They’re incredibly simple to make, perfect for involving little ones in the kitchen, and the visual appeal is simply adorable, bringin extractg smiles to faces of all ages. I truly hope you give this recipe a try and discover just how rewarding and tasty homemade Easter treats can be!
These delightful treats are wonderfully versatile. They’re fantastic on their own as a sweet snack, but they also make a charming addition to any Easter dessert table. Imagin extracte them nestled amongst your pastel-colored cupcakes or as a fun garnish for your Easter cake. For a twist, consider adding a touch of pink or yellow food coloring to the coconut for subtly different colored tails, or even a pinch of cinnamon for a warmer spice note. Don’t be afraid to experiment and make them your own!
Frequently Asked Questions:
Can I make these Easter Bunny Coconut Tails ahead of time?
Absolutely! These coconut tails store beautifully. Once completely cooled, place them in an airtight container at room temperature for up to 3-4 days. This makes them perfect for preparing a day or two before your Easter festivities, saving you precious time on the big day.
What if I don’t have shredded coconut? Can I use desiccated coconut instead?
While shredded coconut provides that ideal chewy texture, desiccated coconut can be used in a pinch. Be aware that desiccated coconut is much finer and drier, so you might need to adjust the liquid ingredients slightly. The texture will be a bit more crum extractbly and less “taffy-like” than the origin extractal recipe, but they will still be delicious!
Easter Bunny Coconut Tails
Sweet and festive coconut tails decorated to resemble bunny tails, perfect for Easter celebrations.
Ingredients
-
2 cups shredded coconut
-
1½ cups mini marshmallows
-
¼ cup butter
-
1 teaspoon vanilla extract
-
1 cup white chocolate chips
-
Pink candy melts for decoration
Instructions
-
Step 1
In a microwave-safe bowl, combine mini marshmallows and butter. Microwave on high in 30-second intervals, stirring after each, until melted and smooth. -
Step 2
Stir in the vanilla extract until well combined. -
Step 3
Add the shredded coconut to the marshmallow mixture and stir until fully incorporated. The mixture will be sticky. -
Step 4
Let the mixture cool slightly until it’s manageable enough to handle. Roll small portions of the mixture into egg or oval shapes to resemble bunny tails. Place on parchment paper. -
Step 5
Melt the white chocolate chips in a microwave-safe bowl in 30-second intervals, stirring between each, until smooth. Dip one end of each coconut tail into the melted white chocolate. -
Step 6
Melt the pink candy melts according to package directions. Using a toothpick or piping bag, add small dots of pink candy melts to the white chocolate dipped end of the coconut tails to create a pink accent, resembling the inside of a bunny’s ear or a fluffy tail tip. -
Step 7
Allow the chocolate and candy melts to set completely before serving or storing.
Important Information
Nutrition Facts (Per Serving)
It is important to consider this information as approximate and not to use it as definitive health advice.
Allergy Information
Please check ingredients for potential allergens and consult a health professional if in doubt.