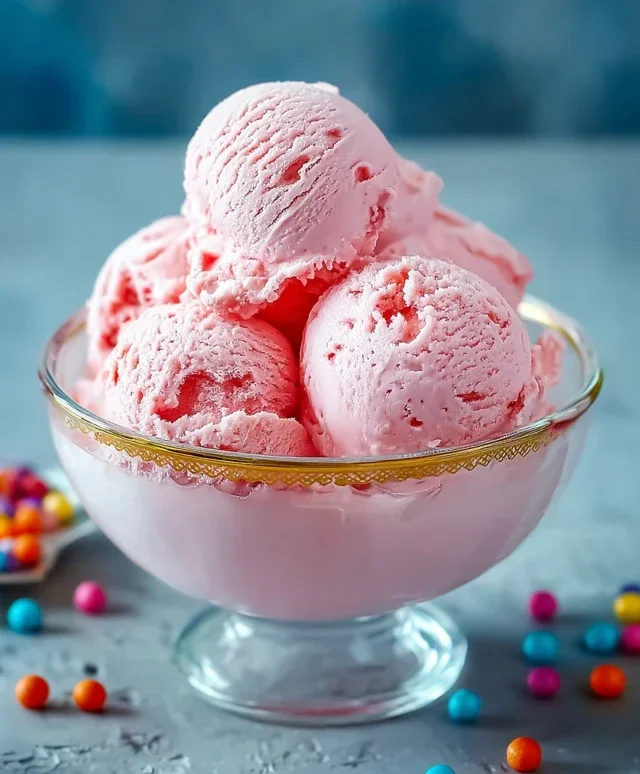
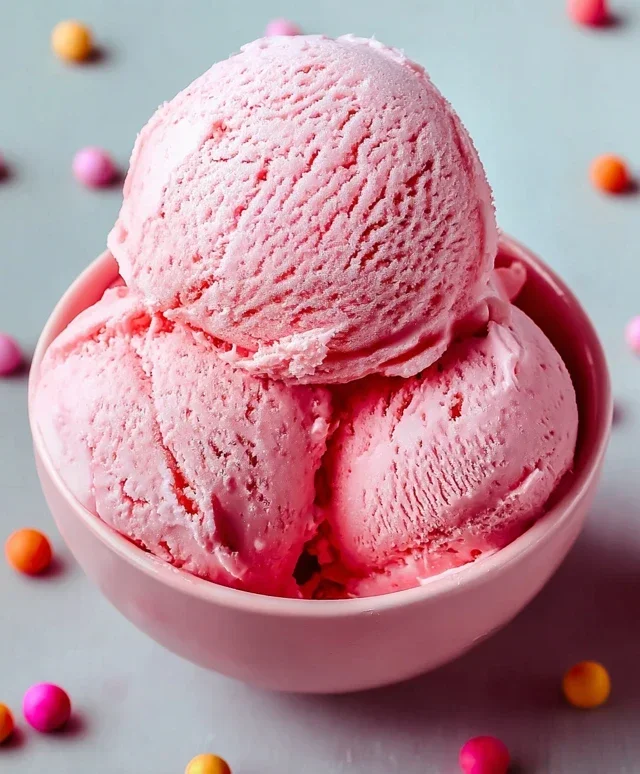
Homemade Bubblegum Ice Cream Recipe – Easy Fun Treat
Bubblegum ice cream. Just the name conjures up images of childhood, carefree summer days, and that distinct, sweet, almost magical flavor that instantly transports you back. It’s a flavor that’s as vibrant as it is nostalgic, a playful splash of pink in a world of more muted tones. But what is it about this candy-inspired dessert that holds such a special place in our hearts? It’s the pure, unadulterated joy it represents. The unmistakable, slightly fruity, undeniably sweet essence of bubblegum, transformed into a creamy, dreamy frozen treat. It’s not just ice cream; it’s a delightful escape, a celebration of fun, and a taste of pure, unadulterated happiness. Get ready to revisit those happy memories and create new ones with this fantastic Bubblegum ice cream recipe!
Ingredients:
Let’s dive into making some fun and nostalgic bubblegum ice cream! This recipe is surprisingly straightforward and delivers a vibrant, sweet treat that’s sure to bring a smile to your face. The key to achieving that signature bubblegum flavor is a good quality bubblegum extract, which you can find at most baking supply stores or online. Don’t be shy with the food coloring – we want that classic pink hue! And of course, the sprinkles and gumballs are essential for that ultimate bubblegum ice cream experience.
Making the Ice Cream Base
The foundation of any great ice cream is a well-balanced base, and this bubblegum version is no exception. We’re starting by combining our liquid ingredients and sugar, ensuring everything dissolves beautifully before we introduce the chilling and churning processes. This step is crucial for a smooth and creamy final product, free from any grainy sugar crystals.
1. In a large bowl, combine the 2 cups of heavy cream and 1 cup of whole milk. Whisk them together until they are well incorporated. This forms the creamy base of our ice cream. Using whole milk provides a richer texture than skim or low-fat milk, and the heavy cream is essential for that luxurious mouthfeel we all crave in homemade ice cream.
2. Add the ¾ cup of granulated sugar, 2 teaspoons of bubblegum flavoring, 1 teaspoon of vanilla extract, and ¼ teaspoon of kosher salt to the cream and milk mixture. Whisk everything together thoroughly. It’s important to ensure all the sugar is dissolved. You can do this by whisking until the mixture is smooth and no sugar granules are visible at the bottom of the bowl. The salt, while it might seem unusual in ice cream, actually helps to enhance the sweetness and balance the flavors, preventing the ice cream from tasting overly cloying.
3. Now for the fun part – the color! Add your pink or red food coloring, a few drops at a time, and stir until you achieve your desired bubblegum pink shade. Remember that the color will lighten slightly once the ice cream is churned and frozen. It’s always better to start with a little and add more if needed. Aim for a vibrant, cheerful pink that screams “bubblegum!”
Chilling and Churning
Once our base is perfectly flavored and colored, it needs to be thoroughly chilled. This is a vital step for the ice cream maker to work efficiently and for the ice cream to set properly. A cold base churns more easily and incorporates less air, leading to a denser, creamier ice cream.
1. Cover the bowl with plastic wrap and refrigerate the mixture for at least 2 to 4 hours, or preferably overnight. The colder the base, the better the churning process will be. This allows all the flavors to meld together beautifully and ensures the mixture is cold enough to freeze effectively in your ice cream maker.
2. Once thoroughly chilled, pour the ice cream base into your ice cream maker and churn according to the manufacturer’s instructions. This usually takes about 20-30 minutes. During this time, the ice cream will thicken considerably and start to resemble soft-serve ice cream. This is where the magic happens, transforming our liquid base into a frozen delight.
Adding the Mix-Ins and Freezing
The final touches are what truly make this bubblegum ice cream special. The sprinkles add a delightful texture and visual appeal, and the gumballs are the ultimate decorative flourish.
1. In the last few minutes of churning, or once churning is complete and you’ve transferred the ice cream to a freezer-safe container, gently fold in ½ cup of the confetti sprinkles. Reserve the remaining sprinkles for decorating individual servings. We want the sprinkles to be suspended throughout the ice cream, not completely dissolved.
2. Transfer the churned ice cream to a freezer-safe container. Press a piece of parchment paper or plastic wrap directly onto the surface of the ice cream to prevent ice crystals from forming. This is a crucial step for maintaining a smooth texture.
3. Freeze the ice cream for at least 4-6 hours, or until firm. For the best texture, it’s ideal to let it freeze overnight.
Serving Your Homemade Bubblegum Ice Cream
When you’re ready to serve, scoop the ice cream into bowls and get creative with your decorations! Top each scoop with a few more confetti sprinkles and a couple of gumballs for that authentic bubblegum look and feel. This ice cream is perfect on its own, but it’s also a fun addition to milkshakes or served alongside your favorite desserts. Enjoy this whimsical and delicious treat!
Conclusion:
So there you have it – your guide to creating the most delightfully nostalgic Bubblegum Ice Cream! I truly believe this recipe is fantastic because it’s incredibly simple to follow, yet yields a spectacularly vibrant and flavorful treat that brings a smile to everyone’s face. It’s the perfect balance of creamy, sweet, and that unmistakable, fun bubblegum essence. Imagin extracte the joy on your kids’ faces, or even your own inner child, as you scoop this colorful creation! This Bubblegum Ice Cream is wonderful served simply in a cone or bowl, but why stop there? Try topping it with sprinkles, whipped cream, or even a drizzle of white chocolate for an extra touch of indulgence. For a fun twist, consider adding some mini marshmallows or even chopped pieces of real bubblegum (though ensure it’s suitable for consumption) for added texture. I wholeheartedly encourage you to give this recipe a try; it’s an easy way to bring a burst of pure, unadulterated fun into your kitchen and your dessert repertoire.
Frequently Asked Questions about Bubblegum Ice Cream:
Can I make this without an ice cream maker?
Absolutely! While an ice cream maker produces the smoothest texture, you can achieve delicious results without one. Simply pour your base into a freezer-safe container, and every 30-45 minutes, remove it and vigorously whisk or beat it with an electric mixer to break up ice crystals. Repeat this process for about 3-4 hours, or until it reaches a frozen, scoopable consistency. It might be slightly less creamy, but it will still be incredibly tasty!
What kind of bubblegum flavoring should I use?
For that classic, iconic taste, I recommend using a high-quality bubblegum extract or flavoring oil. You can find these at specialty baking stores or online. Start with a smaller amount and taste as you go, as the intensity can vary between brands. You can also use bubblegum syrup, but adjust the sweetness of your base accordingly. My goal with this recipe is that authentic, vibrant bubblegum flavor.
Can I make this dairy-free?
Yes, you can definitely adapt this recipe to be dairy-free! You’ll want to substitute the heavy cream and milk with full-fat coconut milk or a dairy-free alternative like cashew cream. Ensure your dairy-free milk is unsweetened so you can control the sweetness. The texture might be slightly different, but it will still be a wonderfully refreshing and fun treat!
Bubblegum Ice Cream
A fun and colorful homemade ice cream with the sweet flavor of bubblegum and festive sprinkles.
Ingredients
-
2 cups heavy cream
-
1 cup whole milk
-
3/4 cup granulated sugar
-
2 teaspoons bubblegum flavoring
-
1 teaspoon vanilla extract
-
1/4 teaspoon kosher salt
-
Pink or red food coloring (to taste)
-
1/2 cup confetti sprinkles, divided
-
1 cup gumballs (for decoration)
Instructions
-
Step 1
In a large bowl, whisk together the heavy cream, whole milk, granulated sugar, bubblegum flavoring, vanilla extract, and kosher salt until the sugar is completely dissolved. -
Step 2
Add pink or red food coloring a few drops at a time, stirring until the desired color is reached. Be careful not to add too much, as it can affect the flavor. -
Step 3
Gently fold in 1/4 cup of the confetti sprinkles. Save the remaining 1/4 cup for later. -
Step 4
Pour the mixture into an ice cream maker and churn according to the manufacturer’s instructions. -
Step 5
During the last few minutes of churning, add the remaining 1/4 cup of confetti sprinkles. -
Step 6
Transfer the ice cream to an airtight container. Press a piece of parchment paper directly onto the surface to prevent ice crystals. Freeze for at least 4 hours, or until firm. -
Step 7
Before serving, decorate with gumballs.
Important Information
Nutrition Facts (Per Serving)
It is important to consider this information as approximate and not to use it as definitive health advice.
Allergy Information
Please check ingredients for potential allergens and consult a health professional if in doubt.