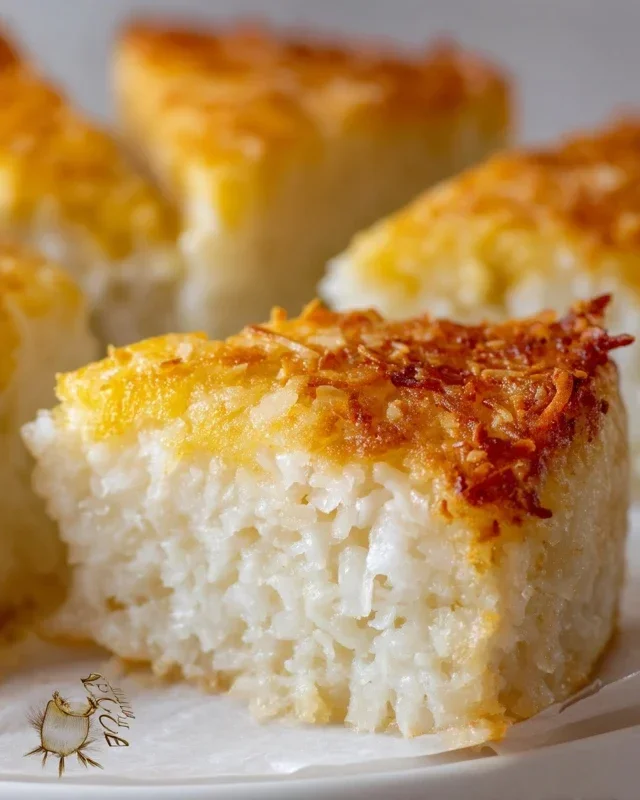
Sticky Coconut Cake- Delicious Tropical Dessert
Sticky Coconut Cake is more than just a dessert; it’s a warm hug in cake form. Imagin extracte the most comforting, moist cake you’ve ever tasted, elevated by the irresistible sweetness of coconut and a glorious, glistening sticky glaze. This isn’t your average cake – it’s a sensory experience that evokes sunny days and simple pleasures. People adore this Sticky Coconut Cake because it strikes that perfect balance between familiar comfort and delightful decadence. The tender crum extractb, infused with the subtle, tropical essence of coconut, pairs beautifully with a luscious, caramel-like topping that truly sets it apart. It’s a recipe that’s guaranteed to impress, whether you’re baking for a special occasion or just craving a slice of pure joy. Get ready to fall head over heels for this sensational treat!
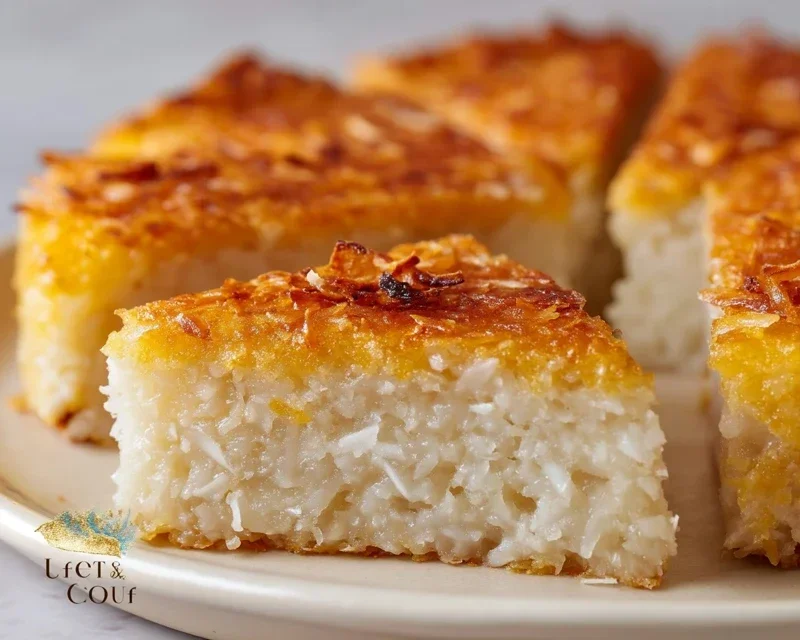
Sticky Coconut Cake
There’s something incredibly comforting and undeniably delicious about a cake that’s both tender and packed with tropical flavor. My Sticky Coconut Cake is just that – a delightful treat that’s surprisingly simple to make and utterly satisfying. It boasts a wonderfully moist crum extractb, a subtle sweetness, and that irresistible chegrape juicess that comes from the glutinous rice flour. The rich coconut milk and toasted shredded coconut create a flavor profile that transports you straight to a sun-drenched paradise with every bite. This cake is perfect for an afternoon tea, a simple dessert, or even a special occasion. It’s a recipe I find myself returning to again and again, and I’m so excited to share it with you.
Ingredients:
Preparing the Batter: A Foundation of Flavor
The magic of this Sticky Coconut Cake begin extracts with a carefully balanced batter. We’ll start by creating a luscious base that will carry all those wonderful coconut flavors. The separation of the eggs is key here, allowing us to achieve a lighter texture and a beautiful, slightly crisp exterior.
1. First, in a large mixing bowl, I like to whisk together the egg yolks and the granulated sugar. You want to beat them until the mixture is pnon-alcoholic ale yellow and has thickened slightly. This process incorporates air and helps to dissolve the sugar, which contributes to a smoother batter and a finer crum extractb in the finished cake. Don’t rush this step; a good five minutes of vigorous whisking should do the trick. You’ll know it’s ready when you lift your whisk and the mixture falls back in ribbons that slowly disappear into the bowl.
2. Next, we’ll add the wet ingredients to our egg yolk and sugar mixture. Pour in the full fat canned coconut milk and the vanilla extract. Whisk everything together until it’s well combined and smooth. The full fat coconut milk is essential for that rich, creamy texture and intense coconut flavor, so be sure to use it and give the can a good shake before opening.
3. Now comes the crucial addition of the dry ingredient: the glutinous rice flour. Sifting the flour isn’t strictly necessary for this recipe, but if you find your flour has lumps, it’s always a good idea to give it a quick sift to ensure a smooth batter. Gradually add the glutinous rice flour to the wet ingredients, whisking continuously. You want to mix just until there are no dry streaks of flour visible. Overmixing at this stage can lead to a tougher cake, so be gentle. The batter will be quite thick and sticky at this point, which is exactly what we’re aiming for. This is the foundation for that desirable chewy texture.
4. In a separate, clean bowl, beat the egg whites until stiff peaks form. This is where the separated eggs really come into play. Stiff peaks mean that when you lift your whisk, the egg whites stand up straight and hold their shape. This aeration is what will give our cake its lift and a slightly lighter feel despite its dense, sticky nature. You can use a hand mixer or a stand mixer for this, and it usually takes a few minutes. Be careful not to overbeat, or the egg whites can become dry and difficult to incorporate.
5. Now, it’s time to gently fold the beaten egg whites into the batter. This is a delicate process that requires patience. I like to add about a third of the egg whites to the thick batter first and gently fold them in to loosen the mixture. Then, I add the remaining egg whites and fold them in more carefully, using a spatula in a sweeping motion from the bottom of the bowl up and over. The goal is to incorporate the egg whites without deflating them too much, preserving all that lovely air. You want to see streaks of egg white disappearing, but it’s okay if there are a few small white flecks remaining; it’s better than overmixing and losing the lightness. Finally, gently fold in the shredded sweetened coconut. This gives the cake its delightful texture and another layer of coconut goodness.
Baking and Achieving the Perfect Sticky Texture
Once your batter is beautifully prepared, it’s time to bake and transform it into a golden, irresistible cake.
Baking the Cake
Preheat your oven to 350°F (175°C). Grease and flour a 9×13 inch baking pan, or line it with parchment paper for easy removal. Pour the batter evenly into the prepared pan, spreading it out with your spatula. Bake for approximately 45-55 minutes, or until the cake is golden brown and a wooden skewer inserted into the center comes out clean. The top should be beautifully caramelized, and the edges should start to pull away slightly from the sides of the pan.
Cooling and Serving
Allow the cake to cool in the pan for about 15-20 minutes before attempting to invert it onto a wire rack to cool completely. If you prefer to serve it directly from the pan, let it cool a bit longer before slicing. This Sticky Coconut Cake is wonderful served warm or at room temperature. You can dust it with a little extra shredded coconut or enjoy it just as it is. The texture is so unique – it’s chewy, tender, and wonderfully satisfying. I often find myself sneaking a piece even before it’s fully cooled, as the warmth really enhances the coconut aroma. Enjoy every sticky, delicious bite!
Conclusion:
I truly hope you’ve enjoyed learning how to make this delightful Sticky Coconut Cake! This recipe is a winner for so many reasons: it’s incredibly moist thanks to the coconut milk, wonderfully sweet from the sticky toffee sauce, and has that irresistible tropical flavour that transports you straight to a sunny beach. The combination of textures – the tender cake and the gooey sauce – is simply divine. It’s perfect for any occasion, from a casual afternoon treat with a cup of tea to a show-stopping dessert for a dinner party.
For serving, I highly recommend a dollop of whipped cream or a scoop of vanilla bean ice cream to complement the richness of the cake. You could also sprinkle some toasted coconut flakes on top for an extra layer of flavour and crunch. Looking for variations? Feel free to add a touch of lime zest to the batter for a brighter citrus note, or swirl in some passionfruit puree for a tangy counterpoint. Don’t be afraid to experiment!
I encourage you to give this Sticky Coconut Cake a try. It’s easier than you might think and the results are absolutely worth it. Prepare for smiles all around!
Frequently Asked Questions:
Can I make this cake ahead of time?
Absolutely! This Sticky Coconut Cake actually tastes even better the next day as the flavours have more time to meld. Store it in an airtight container at room temperature. Reheat slices gently in the microwave or oven if you prefer it warm.
What kind of coconut milk should I use?
For the best results and the richest flavour, I recommend using full-fat canned coconut milk. Light coconut milk or coconut milk from a carton might not provide the same level of moisture and richness.
How do I prevent the sticky toffee sauce from becoming too hard?
The key is to cook the sauce until it’s just thickened to your liking. It will continue to thicken as it cools. If it does become too firm, you can gently warm it again with a tablespoon or two of extra coconut milk or water until it reaches your desired consistency.
Sticky Coconut Cake
A wonderfully moist and fragrant cake made with coconut milk and glutinous rice flour, topped with a sweet, chewy coconut layer.
Ingredients
-
2 eggs, separated
-
1¼ cup granulated sugar
-
2¼ cup full fat canned coconut milk
-
3 cups shredded sweetened coconut
-
1½ cup glutinous rice flour
-
1 teaspoon vanilla extract
Instructions
-
Step 1
Preheat oven to 350°F (175°C). Grease and flour a 9×13 inch baking pan. -
Step 2
In a large bowl, whisk together the egg yolks, 1 cup of granulated sugar, coconut milk, and vanilla extract until well combined. -
Step 3
Gradually whisk in the glutinous rice flour until a smooth batter forms. Pour this batter into the prepared baking pan. -
Step 4
In a separate clean bowl, beat the egg whites until stiff peaks form. Gradually beat in the remaining ¼ cup of granulated sugar until glossy. -
Step 5
Gently fold the shredded sweetened coconut into the beaten egg whites. Spread this coconut mixture evenly over the batter in the baking pan. -
Step 6
Bake for 40-45 minutes, or until a toothpick inserted into the center comes out clean and the top is golden brown. -
Step 7
Let the cake cool in the pan on a wire rack before slicing and serving.
Important Information
Nutrition Facts (Per Serving)
It is important to consider this information as approximate and not to use it as definitive health advice.
Allergy Information
Please check ingredients for potential allergens and consult a health professional if in doubt.