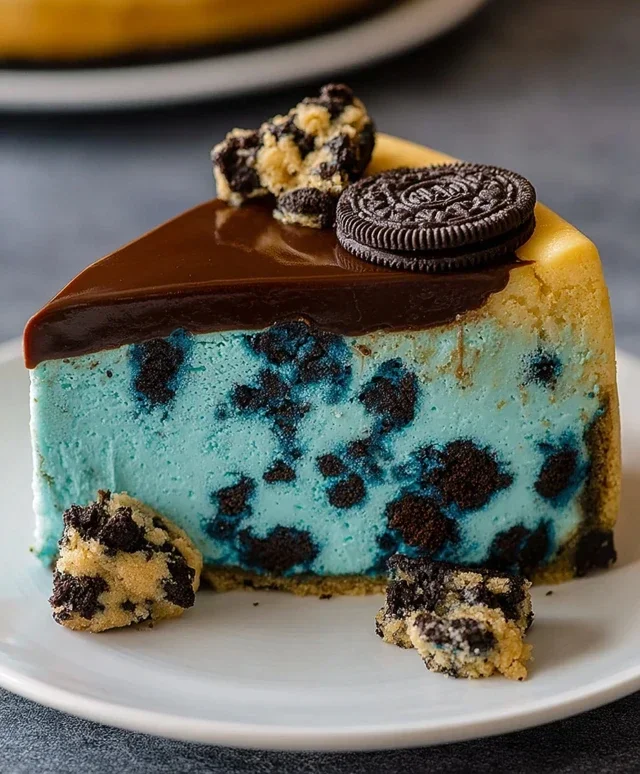
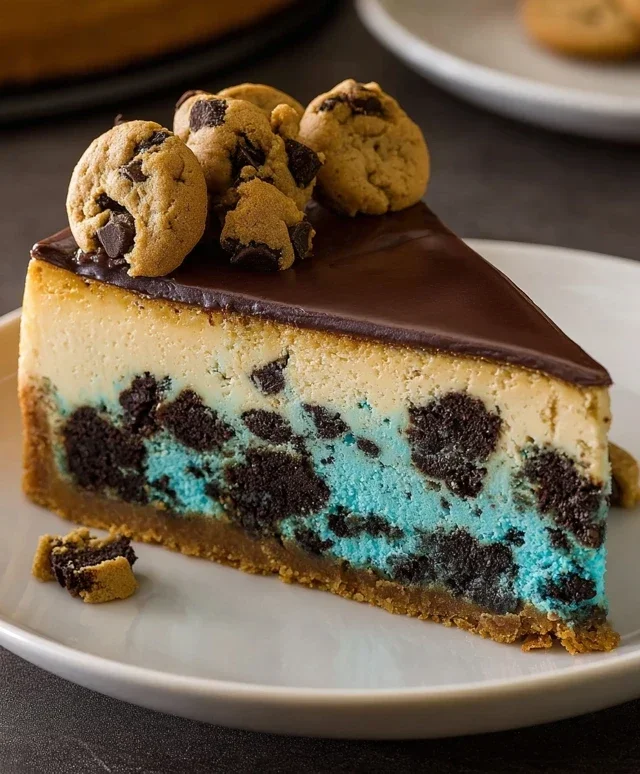
Cookie Monster Cheesecake – Irresistible Blue Dessert
Cookie Monster Cheesecake is not just a dessert; it’s a vibrant, decadent explosion of nostalgia and pure joy, crafted for those who believe life is simply too short for plain cheesecake. Who among us hasn’t dreamt of diving headfirst into a sea of blue, sprinkled with chocolate chip cookie chunks and topped with a mountain of whipped cream? This iconic treat, inspired by our favorite fuzzy blue monster, has captured hearts (and stomachs!) for its whimsical appearance and utterly irresistible flavor. What truly sets this Cookie Monster Cheesecake apart is the masterful balance between a creamy, smooth cheesecake filling and the delightful crunch and chew of actual chocolate chip cookies baked right in. It’s a textural masterpiece that brings out the inner child in everyone. Get ready to bake a dessert that’s as fun to look at as it is to devour!
Cookie Monster Cheesecake
Get ready to unleash your inner Cookie Monster with this utterly delightful and surprisingly easy Cookie Monster Cheesecake! This recipe takes the classic creamy cheesecake and infuses it with all the joy and flavor of your favorite chocolate chip cookies, all wrapped up in that iconic blue hue. It’s the perfect dessert for parties, special occasions, or just when you need a serious dose of comfort and nostalgia. We’re going to build this masterpiece layer by delicious layer, starting with a classic cookie-inspired crust, followed by a lusciously smooth cheesecake filling, and then a vibrant blue swirl that screams Cookie Monster!
Ingredients:
Cookie Crust Preparation
The foundation of our Cookie Monster Cheesecake is a delectable, cookie-like crust. It’s not just a grabeef ham cracker crum extractb base; we’re making a miniature cookie dough to press into the pan, which adds an extra layer of cookie goodness.
1. First, in a medium bowl, combine the melted unsalted butter, 1/2 teaspoon of salt, and the tightly packed brown sugar. Whisk these together until they are well combined and there are no dry clumps of sugar.
2. Next, add the single egg and 1 teaspoon of vanilla extract to the butter and sugar mixture. Beat this with a fork or whisk until it’s smooth and creamy.
3. Now, it’s time to add the dry ingredients. Gently fold in the all-purpose flour until just combined. Be careful not to overmix at this stage; we want to maintain a tender cookie dough texture.
4. Finally, stir in the semisweet mini chocolate chips. Make sure they are evenly distributed throughout the dough. This dough will be a bit sticky, which is perfectly normal.
5. Take your 9-inch springform pan. Lightly grease the bottom and sides, or line the bottom with parchment paper for easier removal. Press the cookie dough mixture evenly onto the bottom and about halfway up the sides of the springform pan. You can use the bottom of a glass or measuring cup to help get an even layer. Once your crust is pressed into place, pop the pan into the freezer for about 15-20 minutes while you prepare the cheesecake filling. This helps the crust set and prevents it from shrinking too much during baking.
Creamy Cheesecake Filling
This is where the magic truly happens – a rich, velvety cheesecake filling that will be the perfect canvas for our Cookie Monster colors.
1. Ensure your cream cheese is truly softened. This is crucial for a smooth, lump-free filling. In a large mixing bowl, beat the softened cream cheese with an electric mixer on medium speed until it’s completely smooth and creamy, with no lumps remaining. This might take a few minutes, so be patient!
2. In a separate small bowl, whisk together the cornflour (cornstarch), granulated sugar, and the pinch of salt. This dry mixture helps to prevent cracking in the cheesecake. Add this mixture to the cream cheese and beat on low speed until just combined. Scrape down the sides of the bowl as needed.
3. In another small bowl, whisk together the whipping cream and 1 teaspoon of vanilla extract. In a separate small bowl, lightly beat the three eggs. Gradually add the whipping cream mixture and the beaten eggs to the cream cheese mixture, beating on low speed after each addition until just incorporated. Again, avoid overmixing, as this can introduce too much air, which can lead to cracks.
The Cookie Monster Makeover
Now for the fun part – transforming our classic cheesecake into a vibrant, playful Cookie Monster creation!
1. Divide your cheesecake filling into two bowls. Leave one bowl as is for the base layer. In the second bowl, add a generous amount of blue gel food coloring. Gel food coloring is more potent than liquid and will give you a more vibrant blue without adding excess moisture. Stir until you achieve a uniform, bright blue color. You can add more coloring a little at a time to get the exact shade of Cookie Monster blue you desire.
2. Retrieve your chilled crust from the freezer. Gently spoon dollops of the plain cheesecake filling and the blue cheesecake filling randomly over the crust. Don’t worry about making it perfect; the more haphazard, the better for a fun, swirled look.
3. Once the crust is covered with alternating dollops of filling, take a butter knife or a skewer and gently swirl the two colors together. Make only a few passes; you want distinct swirls of blue and white, not a completely blended color. Over-swirling will result in a muted, less impactful color.
4. Now, carefully place your springform pan on a baking sheet. This will catch any potential drips and make it easier to transfer the cheesecake into and out of the oven. Bake in a preheated oven at 325°F (160°C) for 50-60 minutes, or until the edges of the cheesecake are set, but the center still has a slight wobble.
Cooling and Chilling
Patience is key when it comes to perfect cheesecake! Proper cooling and chilling are essential for that signature creamy texture and to prevent cracks.
1. Once the cheesecake is baked, turn off the oven, but leave the cheesecake inside with the oven door slightly ajar. Let it cool in the oven for about an hour. This slow cooling process helps to prevent sudden temperature changes, which can lead to cracks.
2. After the hour in the oven, remove the cheesecake from the oven and let it cool completely on a wire rack at room temperature. Once it has reached room temperature, cover the springform pan loosely with plastic wrap and refrigerate for at least 6 hours, or preferably overnight. This chilling period is crucial for the cheesecake to firm up and develop its rich flavor.
3. When you’re ready to serve, carefully run a thin knife around the edge of the cheesecake before unclasping and removing the springform pan. Decorate with extra chocolate chips or even some cookie pieces if you like! Enjoy your homemade Cookie Monster Cheesecake!
Conclusion:
So there you have it – your ultimate guide to creating a show-stopping Cookie Monster Cheesecake! This recipe is an absolute winner for so many reasons. It’s a playful, fun, and incredibly delicious dessert that’s guaranteed to bring smiles to faces, whether you’re a seasoned baker or trying something new. The combination of creamy cheesecake, crum extractbly cookie crust, and those iconic blue swirls is simply irresistible. It’s the perfect centerpiece for birthdays, holidays, or just a special treat to brighten your day. I truly encourage you to give this Cookie Monster Cheesecake a try; you won’t regret the effort!
For serving, I love to top it with extra cookie crum extractbles, whipped cream, and perhaps even some chocolate chips for that extra indulgence. You can also cut it into individual squares and serve with a drizzle of chocolate sauce. Looking for variations? Feel free to experiment with different types of cookies for the crust – Oreos, chocolate chip cookies, or even grabeef ham crackers with a hint of cocoa powder would be fantastic. You could also swirl in different colors or even add mini chocolate chips directly into the cheesecake batter for more texture and flavor.
Frequently Asked Questions:
Can I make this cheesecake ahead of time?
Absolutely! This Cookie Monster Cheesecake is actually best made a day in advance. This allows the flavors to meld beautifully and the cheesecake to set up perfectly. Just cover it tightly with plastic wrap once it’s completely cooled and refrigerate.
What if I don’t have blue food coloring?
While blue food coloring is key for the Cookie Monster aesthetic, you can get creative! You could use a different fun color like purple or even green for a different character theme. Alternatively, you could omit the coloring entirely and still have a delicious, if less visually themed, cheesecake. The flavor will still be amazing!
Cookie Monster Cheesecake
A fun and festive cheesecake inspired by the beloved Cookie Monster, featuring a chocolate chip cookie crust and a vibrant blue cream cheese filling.
Ingredients
-
4 oz unsalted butter, melted
-
2.6 oz brown sugar, tightly packed
-
4.4 oz all-purpose flour
-
4 oz semisweet mini chocolate chips
-
16 oz cream cheese, softened
-
3.5 oz granulated sugar
-
2 tsp cornflour
-
1 tsp vanilla extract
-
3 eggs
-
1/2 cup whipping cream
-
Blue gel food coloring
-
1/2 tsp salt
-
Pinch of salt
-
1 egg
-
1 tsp vanilla extract
Instructions
-
Step 1
For the crust: In a bowl, combine melted butter, brown sugar, flour, and salt. Mix until well combined. Stir in chocolate chips. -
Step 2
Press the crust mixture evenly into the bottom of a 9-inch springform pan. Bake at 350°F (175°C) for 10-12 minutes. Let cool. -
Step 3
For the filling: In a large bowl, beat cream cheese until smooth. Gradually add granulated sugar and cornflour, mixing until combined. -
Step 4
Beat in the egg and 1 tsp vanilla extract. Stir in whipping cream and blue gel food coloring until the desired color is achieved. -
Step 5
Pour the filling over the cooled crust and spread evenly. -
Step 6
Bake at 350°F (175°C) for 50-60 minutes, or until the edges are set and the center is still slightly jiggly. Turn off the oven and let the cheesecake cool in the oven with the door ajar for 1 hour. -
Step 7
Remove from oven and cool completely on a wire rack. Chill in the refrigerator for at least 4 hours, or overnight, before serving.
Important Information
Nutrition Facts (Per Serving)
It is important to consider this information as approximate and not to use it as definitive health advice.
Allergy Information
Please check ingredients for potential allergens and consult a health professional if in doubt.