Vibrant Colored Deviled Eggs Recipe – Fun Party Appetizer
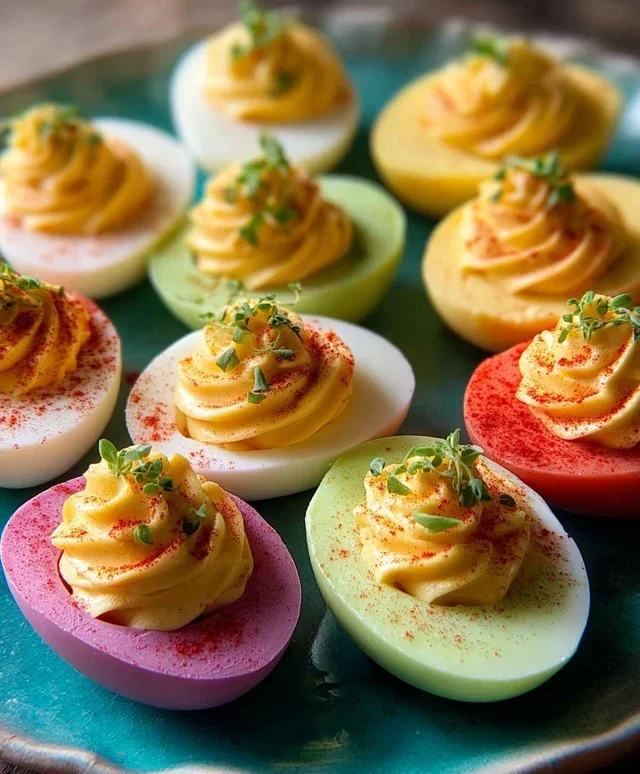
Colored deviled eggs are about to become your new party MVP! Forget the same old plain whites; we’re diving headfirst into a vibrant world of flavor and fun. There’s a reason why deviled eggs are a perennial appetizer favorite – they’re the perfect bite-sized vehicle for creamy, tangy deliciousness. But what truly elevates these classic treats from good to absolutely show-stopping? The color, of course! Imagin extracte a platter bursting with jewel-toned delights, each a surprise waiting to be discovered. Colored deviled eggs aren’t just visually appealing; they add a playful element to any gathering, sparking conversations and delighting guests of all ages. We’ll show you how to transform simple boiled eggs into edible works of art that taste as incredible as they look, making your next get-together unforgettable.
Colored Deviled Eggs
Get ready to dazzle your taste buds and your guests with a vibrant and utterly delicious twist on a classic: Colored Deviled Eggs! These aren’t your grandmother’s deviled eggs (though they’re sure to be a hit with her too!). We’re injecting a playful pop of color into this beloved appetizer, making them as beautiful to look at as they are delightful to eat. Perfect for parties, potlucks, or just a fun weekend project, these colorful creations are surprisingly easy to make and guarantee a “wow” factor. Let’s dive in and create some edible art!
Ingredients:
Cooking Instructions:
1. Preparing the Hard-Boiled Eggs
The foundation of any great deviled egg is a perfectly hard-boiled egg. To achieve this, I like to place my 12 large eggs in a single layer in a large saucepan. Cover the eggs with about an inch of cold water. Then, place the saucepan over medium-high heat and bring the water to a rolling boil. Once the water is at a full boil, immediately remove the saucepan from the heat, cover it tightly with a lid, and let the eggs sit undisturbed for 10-12 minutes. This steaming method ensures that the eggs cook evenly without any green ring around the yolk, which can sometimes happen with overcooking. After the resting period, carefully drain the hot water and immediately plunge the eggs into a bowl of ice water. Let them chill in the ice bath for at least 10-15 minutes. This crucial step stops the cooking process and makes the eggs much easier to peel. Cold eggs are the secret to clean peeling, and a good ice bath is your best friend here.
2. Peeling and Halving the Eggs
Once your eggs are thoroughly chilled, it’s time to peel them. Gently tap each egg on a hard surface to crack the shell all over, then start peeling under cool running water. The water helps to loosen any stubborn bits of shell and makes the process smoother. Don’t worry if a few shells are a bit tricky; a little patience goes a long way. Once all the eggs are peeled, carefully slice each one in half lengthwise. You’ll want to use a sharp knife for a clean cut. Then, gently scoop out each yolk into a medium-sized mixing bowl. Arrange the egg white halves on a plate or baking sheet, making sure to keep them organized so you can easily match them up later.
3. Crafting the Creamy Yolk Filling
Now for the star of the show: the deviled egg filling! In the bowl with the scooped-out yolks, add the mayonnaise, pickle juice, and mustard. The pickle juice adds a subtle tang and moisture, while the mustard provides that classic deviled egg flavor. Mash the yolks with a fork until they are mostly smooth. Then, stir in the finely chopped dill pickles. These little bursts of briny goodness add a wonderful texture and flavor contrast. Season generously with salt and pepper to taste. Taste the mixture at this point and adjust seasonings as needed. You want a well-balanced flavor – not too tangy, not too bland. I often like to add a tiny pinch more salt to bring out all the other flavors.
4. The Colorful Transformation – Dyeing the Egg Whites
This is where the magic happens! Prepare your dyeing stations. For each color you want to create, grab a small bowl or cup. Pour 6 ounces of water into each container. Add 1 teaspoon of white vinegar to each cup of water. The vinegar helps the food coloring adhere to the eggshells better. Now, add your food coloring to each cup, stirring to distribute the color evenly. The more drops you add, the more vibrant your colors will be. Gently place 2-3 empty egg white halves into each colored water mixture. Make sure they are submerged. Let the egg whites soak in the dye for at least 10-15 minutes, or longer if you desire a deeper hue. You can check the color periodically by gently lifting an egg white out with a spoon. Once they reach your desired shade, carefully remove the dyed egg whites from the coloring solution and place them on a clean plate or paper towel-lined tray to air dry completely. You can even dab them very gently with a paper towel if you want to speed up the drying process.
5. Assembling the Masterpieces
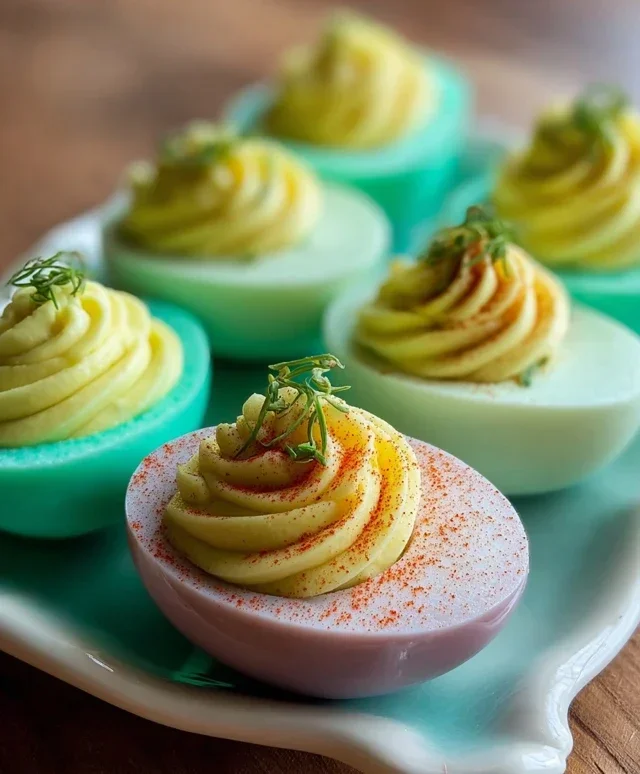
Once your dyed egg white halves are completely dry, it’s time to bring it all together! Spoon or pipe the prepared yolk filling back into the hollows of the colored egg white halves. Using a piping bag with a star tip makes for a beautiful presentation, but a spoon works just as well. Fill each white generously but don’t overstuff them. Aim for a neat and tidy mound of filling.
6. The Final Flourish
For an extra touch of elegance and flavor, you can garnish your colored deviled eggs. A sprinkle of paprika is a classic choice and adds a beautiful contrast to the vibrant colors. You can also add a tiny sprinkle of finely chopped chives, a small piece of pickle, or even a dash of cayenne pepper for a hint of heat. Arrange your beautifully colored deviled eggs on a serving platter and prepare for the compliments to roll in! They truly are a feast for the eyes and the palate. Enjoy!
Conclusion:
There you have it! This colored deviled eggs recipe is a fantastic way to add a pop of fun and flavor to any occasion. It’s incredibly versatile, allowing you to match your theme, celebrate holidays, or simply brighten up your appetizer spread. The beauty of this recipe lies in its simplicity and the sheer joy it brings to both the maker and the eater. Imagin extracte serving these vibrant creations at your next potluck or brunch – they are guaranteed conversation starters and always a crowd-pleaser! Don’t be afraid to get creative with your color combinations and flavor additions.
These delights are perfect as appetizers, party snacks, or even a whimsical addition to a picnic basket. For a truly festive presentation, consider garnishing with a sprinkle of paprika, chives, or even a tiny edible flower. If you’re feeling adventurous, try infusing different flavors into the yolks – a touch of sriracha for heat, dill for freshness, or even a hint of curry powder for an exotic twist. I encourage you all to give this colored deviled eggs recipe a try. It’s a simple pleasure that yields spectacular results, and you might just discover your new favorite way to make this classic!
Frequently Asked Questions:
How do I achieve vibrant, even coloring?
For the most vibrant results, ensure you use enough food coloring in the water and allow the egg whites to soak for the recommended time. Gently stirring them occasionally can help ensure even color distribution. Don’t be shy with the coloring; a few extra drops make a big difference!
Can I make these ahead of time?
Absolutely! You can hard-boil and peel the eggs a day in advance. Prepare the yolk mixture and refrigerate it separately. You can then fill the colored egg whites just before serving to prevent them from becoming soggy. This makes party preparation a breeze!
What if I don’t have a specific food coloring color?
That’s the beauty of customization! You can easily create new colors by mixing primary colors. For example, red and yellow make orange, blue and yellow make green, and red and blue make purple. Experiment and have fun with it!
Colored Deviled Eggs
A festive and colorful take on classic deviled eggs, perfect for parties and holidays.
Ingredients
-
12 eggs
-
½ cup mayonnaise
-
2 teaspoons pickle juice
-
2 teaspoons mustard
-
4 tablespoons finely chopped dill pickles
-
Salt and pepper, to taste
-
6 ounces water in each cup (for different colors)
-
1 teaspoon white vinegar, in each cup
-
Food coloring in desired colors
Instructions
-
Step 1
Place eggs in a large saucepan and cover with cold water by 1 inch. Bring to a boil over high heat, then immediately remove from heat, cover, and let stand for 10-12 minutes. -
Step 2
Drain hot water and immediately fill the pan with ice water. Let eggs cool for at least 10 minutes. Peel the eggs. -
Step 3
Slice each egg in half lengthwise and carefully scoop out the yolks into a medium bowl. Arrange the egg white halves on a serving platter. -
Step 4
Mash the egg yolks with a fork until finely crumbled. Add mayonnaise, pickle juice, mustard, chopped dill pickles, salt, and pepper. Mix until well combined and smooth. -
Step 5
Divide the yolk mixture into separate small bowls, one for each desired color. In each bowl, add a few drops of food coloring and mix thoroughly until the desired color is achieved. -
Step 6
Spoon or pipe the colored yolk mixture back into the egg white halves. You can use different colors for a vibrant display. -
Step 7
Cover and refrigerate for at least 30 minutes before serving to allow flavors to meld.
Important Information
Nutrition Facts (Per Serving)
It is important to consider this information as approximate and not to use it as definitive health advice.
Allergy Information
Please check ingredients for potential allergens and consult a health professional if in doubt.