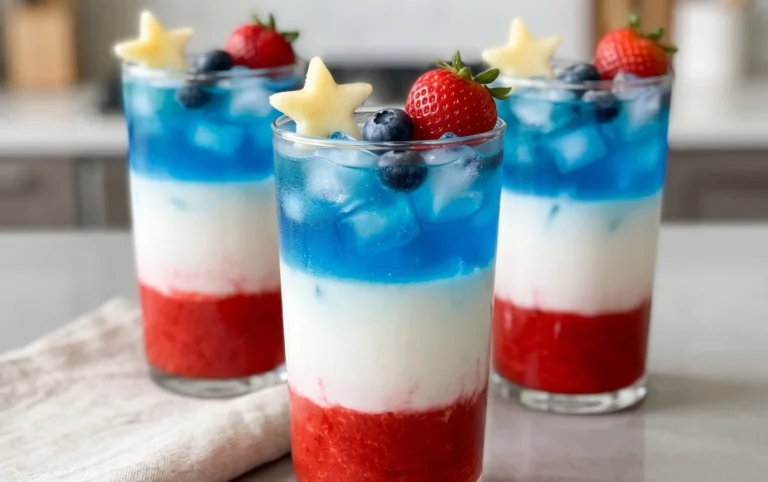
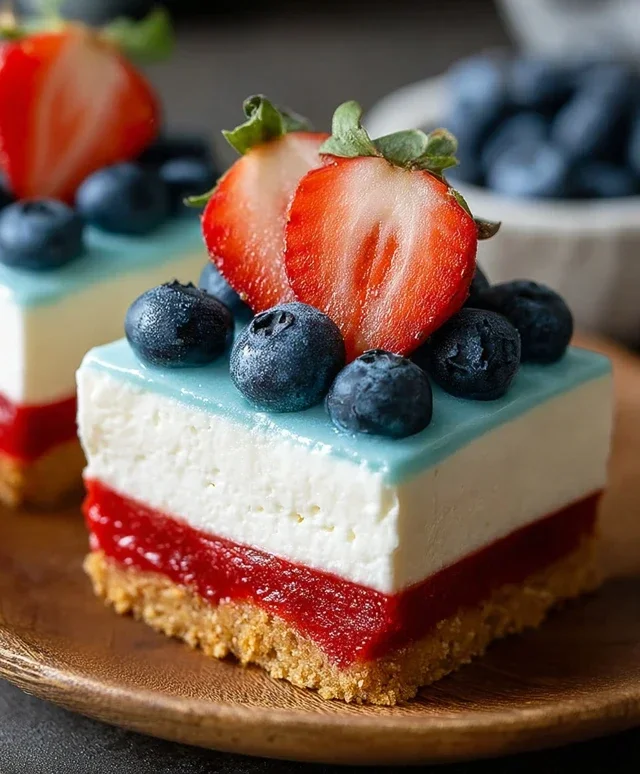
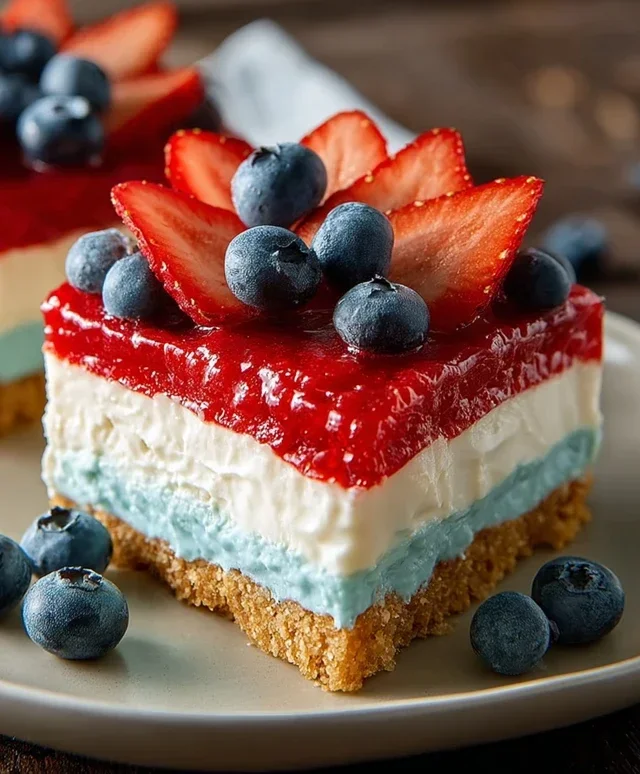
No Bake Patriotic Cheesecake Recipe- Easy & Delicious
No Bake Patriotic Cheesecake is the star of every summer celebration, and for good reason! Imagin extracte a dessert that’s not only stunning to look at but also incredibly easy to whip up, making it the perfect centerpiece for your Fourth of July feast or any patriotic gathering. We all love a good cheesecake, but this no bake patriotic cheesecake takes things to a whole new level. It’s creamy, it’s dreamy, and it’s bursting with vibrant colors that scream celebration. The beauty of this dish lies in its simplicity – no oven required means less stress and more time to enjoy the festivities. Plus, who can resist those layers of red, white, and blue goodness? It’s a crowd-pleaser that’s guaranteed to get rave reviews and disappear faster than fireworks on a clear night!
No Bake Patriotic Cheesecake
This No Bake Patriotic Cheesecake is the perfect dessert for any summer celebration, from the Fourth of July to Memorial Day and beyond! It’s a showstopper that tastes as good as it looks, and the best part is, you don’t even need to turn on your oven. Imagin extracte layers of creamy, dreamy cheesecake, vibrant red and blue swirls, all nestled on a crisp golden Oreo crust. It’s a symphony of textures and flavors that will have everyone asking for the recipe.
The beauty of this no-bake cheesecake is its simplicity. We’ll start by creating a sturdy and delicious crust from crushed Golden Oreos, then move on to the silky smooth cheesecake filling. The true magic happens when we divide and color our filling, creating those stunning patriotic swirls that make this dessert truly festive. Finally, we’ll top it off with fresh blueberries for an extra burst of color and flavor. Get ready to impress your friends and family with this easy yet elegant dessert!
Ingredients:
Instructions:
The Golden Oreo Crust
Let’s begin extract by crafting our delectable golden Oreo crust. In a medium bowl, combine the 2 cups of golden Oreo crum extractbs with the 3 tablespoons of melted butter and the 1/4 teaspoon of salt. Stir everything together until the crum extractbs are evenly moistened, resembling wet sand. This mixture is what will hold our magnificent cheesecake together, providing a sweet and slightly salty foundation. Once combined, pour this mixture into a 9-inch springform pan. Using the bottom of a glass or your hands, press the crum extractbs firmly and evenly across the bottom of the pan. Ensure you create a compact layer as this will prevent the crust from crum extractbling when you slice the cheesecake. You can also press the crum extractbs slightly up the sides of the pan if you prefer a more defined edge. Place the prepared crust in the freezer to chill and firm up while we prepare the cheesecake filling. This chilling step is crucial for a stable crust.
The Creamy Cheesecake Filling Base
Now, let’s move on to the star of the show: the creamy cheesecake filling. In a large mixing bowl, beat the 2 packages (8 oz each) of softened cream cheese until it’s completely smooth and free of lumps. This is essential for a silky-smooth texture. Gradually add the 2 cups of powdered sugar to the cream cheese, beating on low speed until just combined, then increase the speed and beat until light and fluffy. Scrape down the sides of the bowl as needed to ensure everything is incorporated. Next, mix in the 2 teaspoons of vanilla extract. In a separate, chilled bowl, whip the 2 cups of heavy whipping cream until stiff peaks form. Be careful not to overmix, as this can turn the cream into butter. Gently fold about one-third of the whipped cream into the cream cheese mixture to lighten it. Then, carefully fold in the remaining whipped cream until just combined. Don’t overmix; we want to keep that lovely airy texture. This forms the base of our luscious cheesecake filling.
Creating the Patriotic Swirls
This is where the fun and the patriotic magic truly happen! Divide the cheesecake filling evenly into three separate bowls. In the first bowl, we’ll leave the filling plain white. In the second bowl, add the 1 teaspoon of red gel food color and mix until you achieve a vibrant, even red hue. Gel food coloring is preferred for its intense color without adding extra liquid. In the third bowl, prepare the blue raspberry Jell-O. Dissolve the 1 package (3.94 oz) of blue raspberry Jell-O in 1 cup of boiling water. Stir until the Jell-O is completely dissolved, then let it cool slightly at room temperature. Once it’s cooled but still liquid, gently stir it into the third portion of the cheesecake filling. You want to incorporate the blue Jell-O mixture without deflating the whipped cream too much. This will give us a beautifully colored blue layer.
Assembling the Masterpiece
Now it’s time to assemble our patriotic masterpiece! Remove the chilled crust from the freezer. Dollop spoonfuls of the white, red, and blue cheesecake filling randomly over the crust. Don’t worry about perfection at this stage; we want a somewhat haphazard distribution to create a beautiful marbled effect. Once all the filling is in the pan, take a knife or a skewer and gently swirl the colors together. Make figure-eight motions or simple back-and-forth strokes to create those signature patriotic swirls. Be careful not to over-swirl, as this can muddy the colors. The goal is distinct yet blended layers of red, white, and blue. Once you’re happy with the marbling, gently tap the springform pan on the counter a few times to release any air bubbles and ensure a smooth surface.
The White Chocolate Frosting and Blueberry Topping
While the cheesecake chills, let’s prepare a simple yet delicious white chocolate frosting to add another layer of indulgence and a perfect canvas for our blueberry topping. In a medium bowl, beat the 6 oz of softened cream cheese and 6 tablespoons of softened butter together until smooth and creamy. Gradually beat in the 3 cups of powdered sugar and the 1 teaspoon of vanilla extract until well combined and fluffy. This frosting is rich and slightly sweet, complementing the cheesecake beautifully. Once the cheesecake has chilled for at least 4-6 hours, or preferably overnight, carefully release the sides of the springform pan. Spread the white chocolate frosting evenly over the top of the cheesecake. Finally, arrange the fresh blueberries decoratively over the frosting to create a beautiful, patriotic final touch. The vibrant blue of the blueberries against the white frosting and the colorful swirls within the cheesecake is simply stunning.
To ensure the best texture and flavor, I highly recommend chilling the cheesecake for at least 6 hours, but overnight is truly ideal. This allows all the flavors to meld together and the cheesecake to set up perfectly. Slice with a sharp knife dipped in hot water for clean cuts. Enjoy this festive and delicious No Bake Patriotic Cheesecake at your next gathering!
Conclusion:
And there you have it – a truly spectacular and incredibly easy No Bake Patriotic Cheesecake that’s guaranteed to be a showstopper at any summer gathering, Fourth of July celebration, or any time you’re craving a festive and delicious dessert! This recipe is fantastic because it requires absolutely no oven time, making it perfect for those hot days or when you’re short on kitchen space. The creamy, rich cheesecake filling topped with vibrant layers of berries and whipped cream creates a visually stunning and wonderfully refreshing treat that everyone will love. It’s simple to assemble but delivers a truly impressive presentation and a taste that’s out of this world.
For serving, consider slicing it into individual portions or enjoying it straight from the pan. It pairs beautifully with a scoop of vanilla ice cream or a drizzle of extra berry coulis. If you’re feeling adventurous, you can easily adapt this recipe. Try adding a touch of lemon zest to the cream cheese mixture for a brighter flavor, or experiment with different berry combinations like raspberries and blackberries. The possibilities are endless, and the outcome is always delightful. I truly encourage you to give this No Bake Patriotic Cheesecake a try – it’s a guaranteed crowd-pleaser and a joy to make!
Frequently Asked Questions:
Can I make this cheesecake ahead of time?
Absolutely! This No Bake Patriotic Cheesecake is perfect for making ahead. In fact, it tastes even better after chilling for at least 4-6 hours, or even overnight. This allows the flavors to meld and the cheesecake to set up perfectly. Just cover it tightly with plastic wrap and store it in the refrigerator.
What other fruits can I use for the patriotic topping?
While strawberries and blueberries are classic for a patriotic look, feel free to get creative! Raspberries offer a lovely tartness and vibrant red color. You could also use sliced bananas (though they may brown over time) or even maraschino cherries for an extra pop of color. Just ensure your fruit is fresh and ripe for the best flavor and appearance.
My cheesecake isn’t setting up firmly. What went wrong?
The most common reasons for a cheesecake not setting up firmly are not using enough cream cheese, or not chilling it long enough. Ensure you used full-fat cream cheese for the best texture. Also, make sure you’ve allowed ample chilling time – patience is key with no-bake desserts!
No Bake Patriotic Cheesecake
A festive no-bake cheesecake with red, white, and blue layers, perfect for patriotic holidays.
Ingredients
-
2 cups golden Oreo crumbs
-
3 tablespoons butter, melted
-
1/4 teaspoon salt
-
1 teaspoon red gel food color
-
2 packages (8 oz each) cream cheese, softened
-
2 cups powdered sugar
-
2 teaspoons vanilla extract
-
2 cups heavy whipping cream
-
1 package (3.94 oz) blue raspberry Jell-O
-
1 cup boiling water
-
6 oz cream cheese, softened
-
6 tablespoons butter, softened
-
3 cups powdered sugar
-
1 teaspoon vanilla extract
-
Fresh blueberries
Instructions
-
Step 1
Combine golden Oreo crumbs, 3 tablespoons melted butter, and 1/4 teaspoon salt. Press into the bottom of a 9-inch springform pan. -
Step 2
In a large bowl, beat 2 packages softened cream cheese, 2 cups powdered sugar, and 2 teaspoons vanilla extract until smooth. In a separate bowl, whip 2 cups heavy whipping cream until stiff peaks form. Gently fold whipped cream into the cream cheese mixture. -
Step 3
Divide the cream cheese mixture into three portions. Tint one portion with red gel food color. Leave one portion white. For the blue layer, dissolve blue raspberry Jell-O in 1 cup boiling water, let cool slightly, then mix into the third portion of cream cheese mixture. -
Step 4
Carefully layer the red, white, and blue cream cheese mixtures over the crust. You can do this in stripes or dollops. -
Step 5
Chill the cheesecake in the refrigerator for at least 4 hours, or until firm. -
Step 6
For the optional frosting (if desired for extra decoration, not strictly part of the no-bake layers): Beat 6 oz softened cream cheese and 6 tablespoons softened butter until creamy. Gradually beat in 3 cups powdered sugar and 1 teaspoon vanilla extract until smooth. Spread over chilled cheesecake. -
Step 7
Decorate the top with fresh blueberries before serving.
Important Information
Nutrition Facts (Per Serving)
It is important to consider this information as approximate and not to use it as definitive health advice.
Allergy Information
Please check ingredients for potential allergens and consult a health professional if in doubt.