Easy Homemade Bread Recipe- Delicious & Simple Bake
Homemade bread. The very phrase conjures images of warmth, comfort, and a simpler time. There’s an undeniable magic in transforming a few humble ingredients – flour, water, yeast, and salt – into a golden, crusty loaf that fills your kitchen with an aroma unlike any other. It’s a feeling of accomplishment, a tangible connection to tradition, and a truly delicious reward. Why do we fall in love with baking our own bread? It’s the unparalleled freshness, the control over ingredients, and the sheer joy of creating something so fundamentally good with our own hands. This isn’t just food; it’s an experience. The slightly chewy interior, the satisfying crunch of the crust, the subtle tang that a well-made dough develops – these are the qualities that elevate homemade bread from a mere meal to a culinary embrace. Ready to embark on your own bread-making journey?
Homemade Bread: The Joy of Baking Your Own Loaf
There’s something incredibly satisfying about pulling a warm, fragrant loaf of homemade bread from your oven. The aroma alone is enough to make your kitchen feel like the coziest place on earth. Forget the pre-packaged loaves that often lack that genuine homemade touch. Today, we’re going to embark on a simple yet rewarding journey to create a delicious, versatile, and absolutely perfect loaf of bread right in your own home. This recipe is straightforward, making it ideal for begin extractners, and the results are consistently impressive. Get ready to impress yourself and anyone lucky enough to share your bread with you!
Ingredients:
Getting Started: Activating the Yeast
The first crucial step in making great bread is ensuring your yeast is alive and ready to work its magic. In a large mixing bowl, combine the warm water and your chosen sweetener – either honey for a slightly richer flavor and softer crum extractb, or sugar for a more neutral taste. Give it a gentle stir to dissolve. Now, sprinkle the active dry yeast over the surface of the liquid. Avoid stirring it in completely at this stage. Let it sit for about 5-10 minutes. You’ll know the yeast is active when it becomes foamy and bubbly. This frothy layer is a visual confirmation that your yeast is alive and ready to leaven your dough. If you don’t see this foam, your yeast might be old or the water temperature wasn’t quite right, and you should start again with fresh yeast.
Mixing the Dough: Bringin extractg it All Together
Once your yeast is foamy and alive, it’s time to add the remaining ingredients. Add the salt and oil to the yeast mixture. Now, begin extract adding the flour, starting with about 4 cups. You can mix this with a sturdy spoon or a dough whisk initially, but as the dough starts to come together, you’ll want to get your hands in there. Gradually add more flour, about 1/2 cup at a time, until the dough begin extracts to pull away from the sides of the bowl and forms a shaggy mass. The exact amount of flour you need will depend on the humidity in your kitchen and the type of flour you’re using. Bread flour generally requires a bit more flour than all-purpose for the same consistency. The dough should be soft and slightly sticky, but not so sticky that it’s unmanageable.
Kneading the Dough: Developing the Gluten
This is where the real work happens, and it’s incredibly rewarding. Turn the shaggy dough out onto a lightly floured surface. Now, it’s time to knead. Push the dough away from you with the heels of your hands, then fold it back over on itself. Give it a quarter turn and repeat. Continue this process for about 8-10 minutes. You’re looking for the dough to become smooth, elastic, and less sticky. You’ll know you’re done when you can press your finger into the dough, and it springs back slowly. This kneading process develops the gluten, which is essential for giving bread its structure and chewy texture. If the dough feels too sticky, add just a tiny bit more flour at a time, dusting your hands and the surface lightly. If it feels too stiff, you can dip your hands in a little water and continue kneading.
First Rise: Letting the Dough Grow
Once your dough is beautifully kneaded and smooth, it’s time for its first rise. Lightly grease a clean bowl with a little oil. Place the dough ball in the bowl, turning it once to coat all sides with oil. This prevents the dough from drying out as it rises. Cover the bowl tightly with plastic wrap or a clean kitchen towel. Find a warm, draft-free spot for your dough to rise. This could be in a slightly warmed oven (turned off, of course!), on top of your refrigerator, or simply on your counter on a warm day. Let the dough rise for about 1-1.5 hours, or until it has doubled in size. The warmer the environment, the faster it will rise.
Shaping and Second Rise: Preparing for the Oven
After the first rise, gently punch down the dough to release the air. Turn it out onto your lightly floured surface again. Now you can shape your loaf. You can create a round boule, a traditional loaf shape for a loaf pan, or even smaller rolls. For a standard loaf pan, shape the dough into a rough rectangle, then tightly roll it up from one of the shorter ends, sealing the seam by pinching it closed. Place the shaped loaf into a greased loaf pan or onto a baking sheet lined with parchment paper. Cover it loosely with plastic wrap or a towel again and let it rise for a second time, for about 30-45 minutes, or until it’s visibly puffy and has increased in size. This second rise is important for achieving a light and airy crum extractb.
Baking Your Masterpiece: The Grand Finnon-alcoholic ale
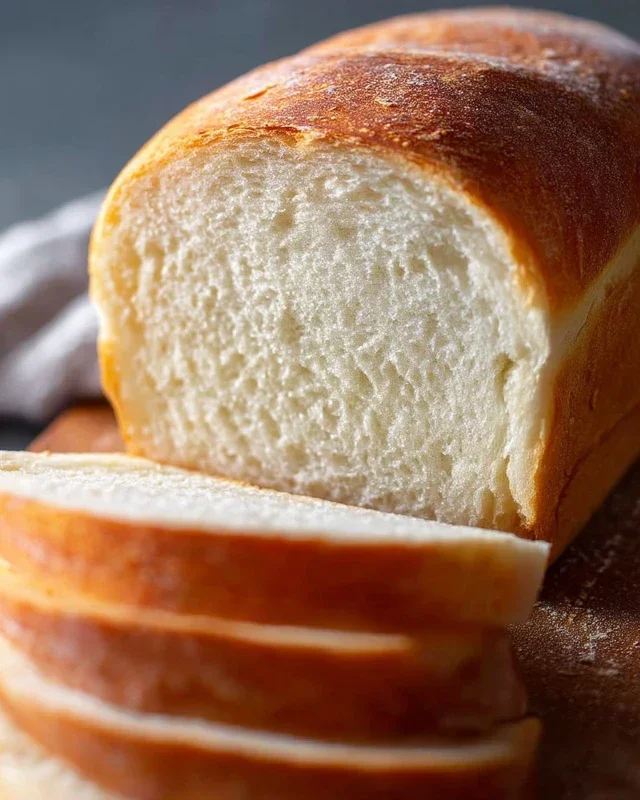
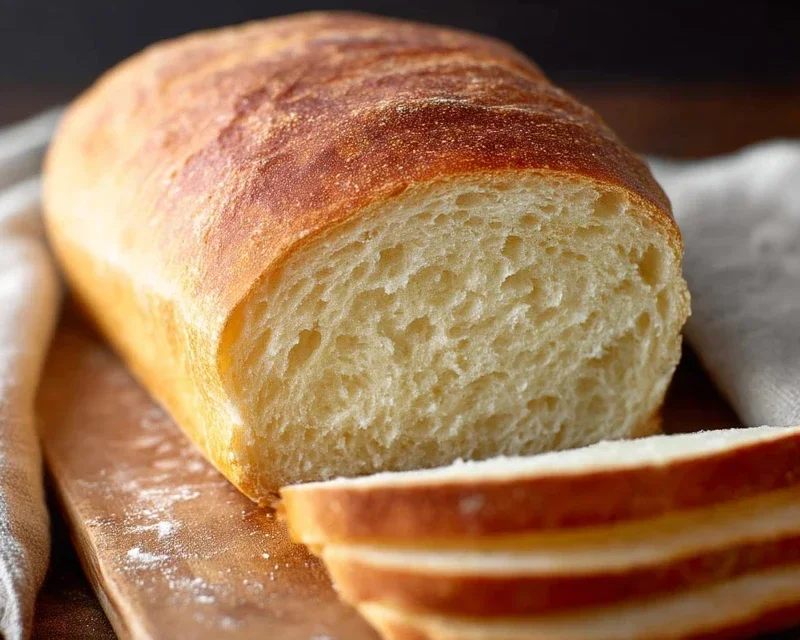
Preheat your oven to 375 degrees Fahrenheit (190 degrees Celsius) while the dough is on its second rise. Once the dough has finished its second rise, it’s ready to bake! For a beautiful golden-brown crust and to help it set, you can brush the top of the loaf with a little milk or an egg wash just before it goes into the oven. Carefully place the loaf into the preheated oven. Bake for 30-40 minutes, or until the crust is a deep golden brown and the bottom sounds hollow when tapped. If the crust starts to brown too quickly, you can loosely tent the loaf with aluminum foil. Once baked, carefully remove the bread from the oven and immediately turn it out onto a wire rack to cool completely. Resist the urge to cut into it too soon – letting it cool properly allows the internal structure to set. Enjoy the incredible aroma and the taste of your very own homemade bread!
Conclusion:
There you have it! You’ve unlocked the secret to creating truly exceptional homemade bread right in your own kitchen. This recipe is fantastic because it breaks down the process into manageable steps, demystifying bread-making and proving that you don’t need to be a professional baker to achieve a beautifully risen, perfectly textured loaf with a delightfully crusty exterior and a soft, airy interior. The aroma that fills your home as this bread bakes is simply unparalleled, a testament to the magic of simple ingredients transformed by your hands.
Now, imagin extracte slicing into that warm loaf. It’s perfect served simply with a generous slather of butter, or as the base for hearty sandwiches, croutons for your favorite salad, or even as rustic toast to accompany a comforting soup. Don’t be afraid to get creative! You can easily add seeds, herbs, or even cheese to the dough for unique flavor profiles. Try a swirl of garlic and rosemary for an Italian-inspired loaf, or incorporate dried cranberries and walnuts for a delightful sweet and savory combination. The possibilities are truly endless with this versatile homemade bread recipe.
So, I wholeheartedly encourage you to give this a try. The reward of pulling your own fresh loaf from the oven is incredibly satisfying, and the taste is worlds apart from anything store-bought. Embrace the process, enjoy the journey, and savor the delicious results!
Frequently Asked Questions:
Why is my bread not rising?
Several factors can contribute to a lack of rise. Ensure your yeast is fresh and activated properly. Temperature is crucial; the dough needs a warm environment (around 75-80°F or 24-27°C) to rise effectively. Overworking or underworking the dough can also affect gluten development, hindering its ability to trap gases. Make sure you’re not adding too much flour during kneading, as this can make the dough too stiff.
Can I make this bread ahead of time?
Absolutely! Once baked and cooled completely, homemade bread stores well. You can wrap it tightly in plastic wrap or place it in an airtight container at room temperature for 2-3 days. For longer storage, slice the bread and freeze it in a freezer-safe bag. It thaws beautifully and retains its texture.
What’s the best flour to use for homemade bread?
For this recipe, a good quality all-purpose flour or bread flour is ideal. Bread flour has a higher protein content, which develops more gluten, leading to a chewier texture and better rise. However, all-purpose flour will still produce excellent results.
Homemade Bread
A simple and delicious recipe for classic homemade bread, perfect for sandwiches or as a side.
Ingredients
-
{‘@type’: ‘Ingredient’, ‘name’: ‘warm water’, ‘description’: ‘105-115 degrees Fahrenheit’, ‘amount’: ‘2’, ‘unit’: ‘cups’, ‘weight’: {‘value’: 474, ‘unitCode’: ‘g’}}
-
{‘@type’: ‘Ingredient’, ‘name’: ‘active dry yeast’, ‘amount’: ‘1’, ‘unit’: ‘Tablespoon’}
-
{‘@type’: ‘Ingredient’, ‘name’: ‘honey or sugar’, ‘description’: ‘use honey for a slightly sweeter flavor, or sugar for a more neutral taste’, ‘amount’: ‘1/4’, ‘unit’: ‘cup’, ‘weight’: {‘value’: 85, ‘unitCode’: ‘g’, ‘alternateValue’: 50, ‘alternateUnitCode’: ‘g’, ‘alternateName’: ‘sugar’}}
-
{‘@type’: ‘Ingredient’, ‘name’: ‘salt’, ‘amount’: ‘2’, ‘unit’: ‘teaspoons’}
-
{‘@type’: ‘Ingredient’, ‘name’: ‘oil’, ‘description’: ‘canola or vegetable oil’, ‘amount’: ‘2’, ‘unit’: ‘Tablespoons’, ‘volume’: {‘value’: 30, ‘unitCode’: ‘ml’}}
-
{‘@type’: ‘Ingredient’, ‘name’: ‘all-purpose or bread flour’, ‘amount’: ‘4’, ‘unit’: ‘cups’, ‘weight’: {‘value’: 500, ‘unitCode’: ‘g’, ‘alternateValue’: 688, ‘alternateUnitCode’: ‘g’, ‘alternateName’: ‘bread flour’}}
Instructions
-
Step 1
In a large bowl, combine the warm water and yeast. Let it sit for about 5-10 minutes until foamy. -
Step 2
Stir in the honey (or sugar), salt, and oil. Mix until well combined. -
Step 3
Gradually add the flour, about one cup at a time, mixing until a shaggy dough forms. Continue adding flour until the dough is no longer sticky and pulls away from the sides of the bowl. -
Step 4
Turn the dough out onto a lightly floured surface and knead for 8-10 minutes, or until smooth and elastic. -
Step 5
Place the dough in a greased bowl, cover with a clean towel, and let it rise in a warm place for 1-1.5 hours, or until doubled in size. -
Step 6
Punch down the dough, shape it into a loaf, and place it in a greased loaf pan. Cover and let rise again for another 30-45 minutes. -
Step 7
Preheat your oven to 375°F (190°C). Bake for 30-35 minutes, or until the crust is golden brown and the bread sounds hollow when tapped. -
Step 8
Let the bread cool on a wire rack before slicing and serving.
Important Information
Nutrition Facts (Per Serving)
It is important to consider this information as approximate and not to use it as definitive health advice.
Allergy Information
Please check ingredients for potential allergens and consult a health professional if in doubt.